(this essay can be listened to as a narration. 1 hour, 80 megs.)
In the early months of 2015, I decided to stop doing pretty much everything I’d been doing up until that point — certainly to stop thinking how I’d been thinking up until that point — and unplug everything. I had spent the previous fourteen years trying to make the internet care about everything I did, and somewhere between how that's an obviously terrible endeavor for anybody and a particularly terrible endeavor for me, my spiral of increasingly-tiny validation windsprints collapsed into a disgusting pile of panting jackass and everything stopped.
When the dust cleared, I had an internet-shaped hole in my head.
“You should get into Arduino. Seems like the kind of thing you’d be into.”
— Paul S.
apropos of nothing
Arduino, for the uninitiated, is an electronics development platform that brings together the tools of basic electrical engineering (resistors, microchips, circuit boards, motors, switches, LEDs) with the tools of software (code, debugging, scripts for outcomes based on user behavior) in a comprehensible ecosystem of institutional tweakability. Want a machine that sends you a tweet when your cat poops? ...why? No, sure, you can knock that out with an Arduino board in an afternoon. How about this: want the door of the litter box to stay closed unless your cat is walking by, so the dog can't get into it? You'll need a couple of parts for that, and pre-made versions of both are cheaply available. What's that? You want confirmation that your cat has been stealing your beer texted to you the moment the cat fails a breathalyzer test you’ve hidden in their litter box?
That’s insane. You’re insane. Do it.
When I heard about all this “Ar-Dwee-No” stuff, visions of unlimited power descended upon me. I knew absolutely nothing about electronics or programming, but — with no internet to alternately chase and be chased by — there was a buzzing in my head to deal with. Maybe Paul was right.
I got an Arduino book for beginners and a spiral-bound notebook and started taking notes like it was a class; resistors are measured in ohms, capacitors are measured in farads. As I waded into the RadioShack of it all, I also started learning first principles as a programmer; if/else arguments, floating point numbers, looping logic. I had fine-tipped Micron pens in a handful of colors and I'd sit down and make diagrams for myself until everything seemed to make sense.
It was boring. It was abstract. Nothing I was learning would stand a chance of being committed to memory without having a practical use to weigh it down; what I needed was a project, something to use this knowledge on. Something I’d want to finish; something where I'd be learning these things because I couldn’t finish the project without learning them. Something that promised to be cool enough that it'd be worth the frustration of figuring out how to do it in the first place.
I don't care about Connect Four at all, it must be said. I'm bad at Connect Four. I don't have any particularly fond memories of playing Connect Four. My mind drifted to Connect Four only after I started establishing limitations of scope for myself; "well, maybe a video game," "with minimalist gameplay," "and minimalist control surfaces." I imagined a grid of lights; then I imagined it with knobs and buttons. I’d need something sturdy to mount it all on, something I could work with . I’d need it to look cool, which would mean giving it a finish. I knew a few tricks for making wood look antique; I could work with wood. Wood would work. I imagined an antique piece of wooden furniture; then I imagined it with anachronistic future-retro electronics.
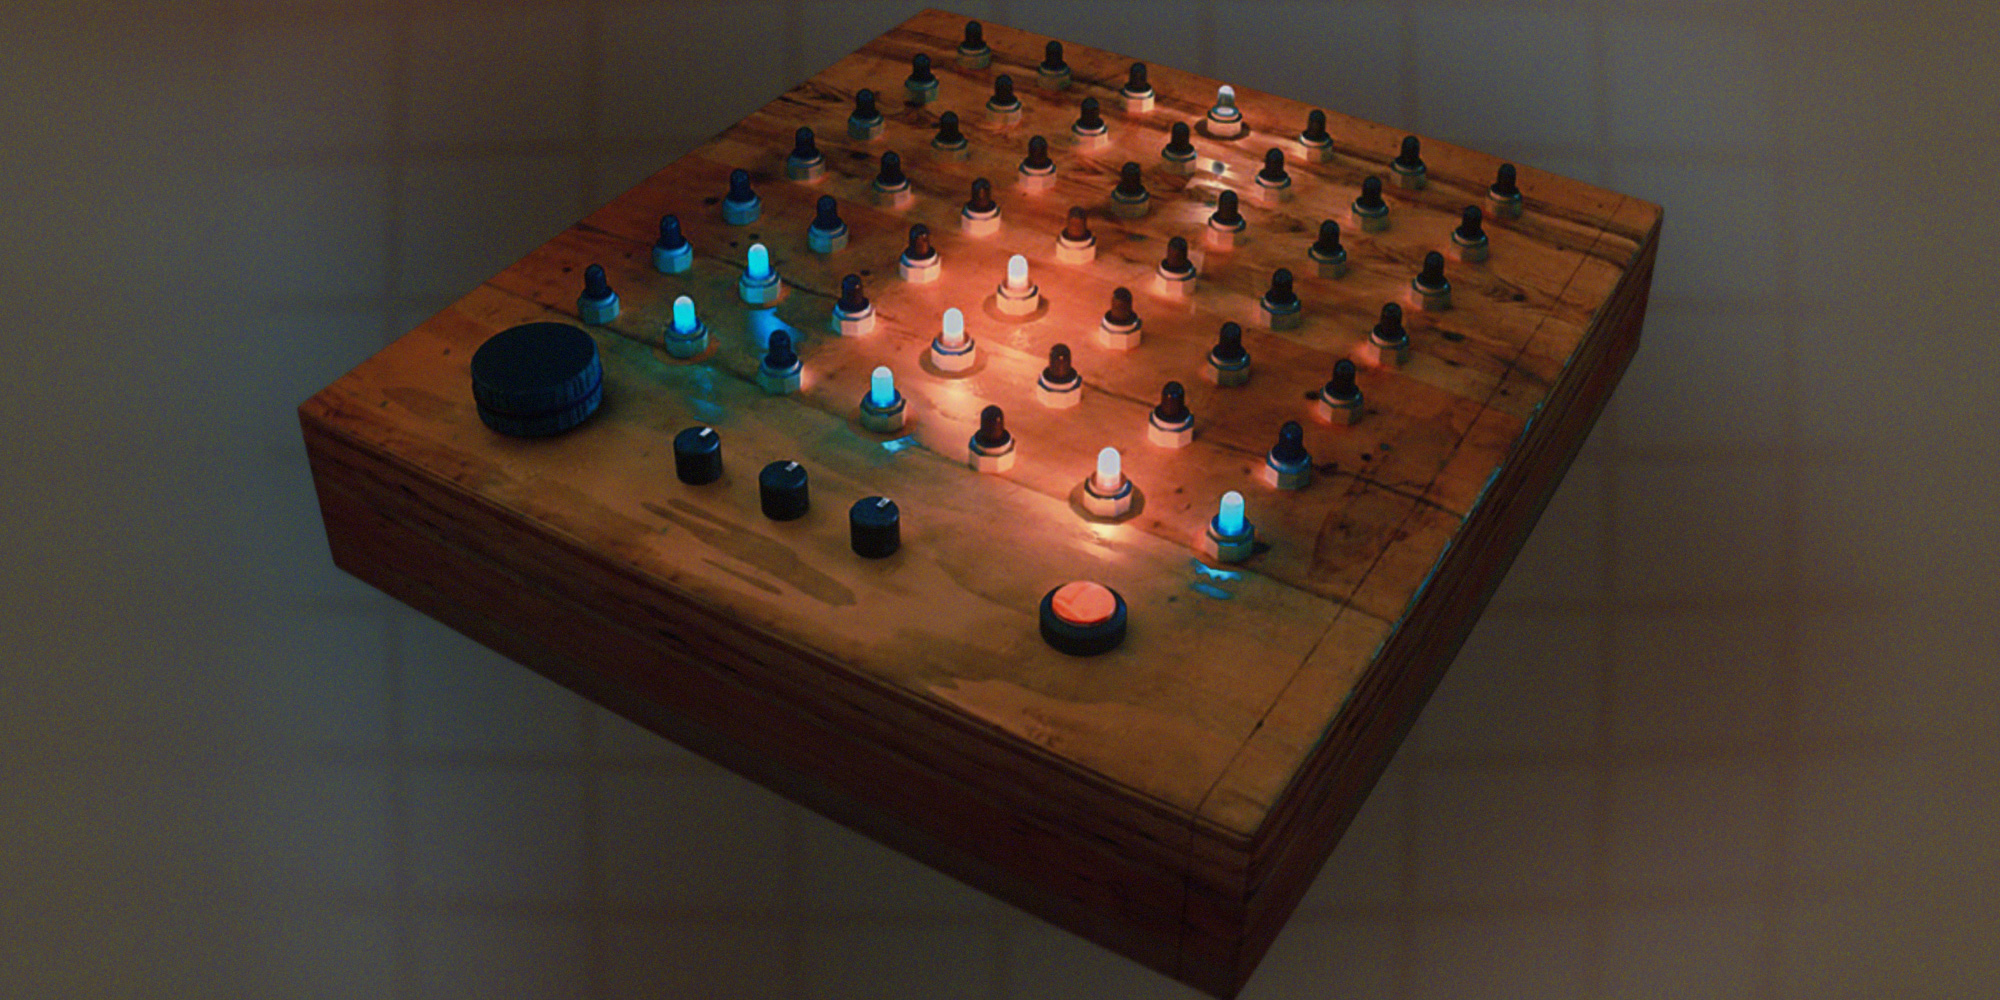
I could make an antique video game, a fake artifact — almost like a steampunk thing, but with art-deco electronics instead of steam, and “1930s Radiola” instead of “1860s train." I could take a dead-simple user interface of knobs and LEDs, use it to run a dead-simple game of stacking lights, and build it all into a dead-simple cabinet of shellacked wood.
This seems reasonable , I thought.
Setting aside the fact that I actually had no idea how steps “after you’ve drilled the holes” through “finish the project” would be handled, I figured I had arranged a solid threefer for myself.
At work I do visual effects on movies and TV, so I spend a lot of time creating images of things that don't exist; having access to those skills for dumb personal projects is one of the fringe benefits. This is how, barely an hour after conceiving of an incredibly dorky word, I came to be looking at a CGI rendering of it: Connect Four the video game, in the imaginary pseudo-aesthetic of radiopunk.
First I had a notion, then an idea, then a couple of intentions, then a handful of completely unqualified assumptions that several things I knew nothing about would be doable upon trying, then a CGI graphic and a dorky word — but it wasn’t much . It was still a lark. I might still have stopped. I t wasn’t until I was actually staring at my concept art that three heavy thoughts settled upon me: “okay, I want to have that thing,” “ah, so now the buzzing in your head will only be silenced by tricking electrons into dancing for your amusement?, ” and “...I can drill holes.”
Wanna get to shore? Jump out of the boat; that’ll put a fire under your ass.
For about a month straight, in addition to my regularly-scheduled book perusal and educational baby steps, I was taking wild shots in the dark on Google trying to figure out various pieces of my puzzle; I put a folder of bookmarks on my toolbar and began to drag everything on the internet into it. The real complication in setting yourself upon a task that far exceeds your grasp is that you can have a clear idea of what you want — you can even have a clear idea of what it would look like — but still have absolutely no clue how to get there. You don't even know the insane options available to you, much less the sane ones. You feel like the Wright brothers, poring over pictures of birds in flight, going, "okay, well, they all seem to have... heads, right? Let's start with heads."
I started with lightbulbs. "Learn Arduino"-style books tend to arrive at LEDs fairly early, because there’s only a couple key principles to remember: send power to the right wire, and don’t send too much. Cool. I’d just need a bunch in a grid — right? (“Let’s start with heads — right?” “I don’t think heads are it, Orv.”) Heads aren’t it, Wilb. My problem wasn’t rigging up a 7x7 grid of LEDs to blink, it was rigging up a grid of 49 LEDs to blink as individuals; it was sending a custom signal of “on”-ness to 49 LEDs. Moreover, I also wanted players to choose their own color, which would require sending three custom signals — “red”-ness, “green”-ness, and “blue”-ness — to 49 LEDs.
147 signals per-freaking-turn, I thought. Connect Four was a dumb choice.
· · · · ·
Let's take a step back and talk about what an Arduino board does.
We know (without needing the specifics) that it's within the realm of human ability to take a piece of blank circuit board and throw some lights and switches onto it to make a little circuit that routes power through various components at various times depending on which switches are open and closed. We mess with light switches every day, of course — same thing. Once such a system has been built, whether it’s a big one in a house or a small one on a piece of plastic, it will sit there and do nothing. You have to bring your finger to the circuit for anything to happen next.
Unrelated to that, we know (without needing the specifics) that certain human people have the ability to open up a word processor and type code using the ancient computer-math language of the mystics, and that then — somehow — the computer will follow those instructions. Software, web pages, games, expressions in Excel; all built with rulebooks of shorthand that tell the machine what to do when X happens and what to do when Y happens.
Arduino is at the intersection; Arduino is for building circuits that use code to push the buttons.
When you get right down to it, the Arduino can only do (and only needs to do) three things: it can articulate incoming voltages, it can articulate outgoing voltages, and it can follow orders. You set up a circuit and tell it what to do, Arduino will handle the rest. The ramifications are staggering; a machine to contro l electricity with your opinion, sixteen million times a second . At what cost? The entry-level Arduino Uno costs less than a nice steak; this to cover both the board and the time they spent making it easy to use. If you're not intimidated by knock-off boards from weird companies somewhere else on Earth, you can buy god-like power for a fiver and nobody seems to mind at all.
· · · · ·
By the time I arrived at the problem of needing to send 147 signals to 49 LEDs, I knew that stuff.
I knew you could read voltages from high to low, allowing for things like knobs and buttons that return different voltages to the Arduino as you adjust them; I knew you could set voltages from high to low, allowing for things like lightbulbs that dim and brighten. I knew you could make an Arduino flip the lightswitch for you sixteen million times a second.
What hadn’t occurred to me was this: an Arduino Uno’s voltage input/output terminals number in the low tens. My plan, such as it was — running a wire from each I/O terminal to an LED that would blink with great majesty — would work with, maybe, 15 LEDs; not 49, and definitely not in three colors. I knew no way around this problem. I knew one thing, and it was the wrong thing.
The complication of a task that far exceeds your grasp is probably your grasp’s fault, and t his is what makes the ‘advanced beginner’ stage such a drag — your whole plan can fall apart real easy.
One of the few forgiving aspects of diving headfirst into a pool of unknowns is that, while the pool is mostly comprised of "struggles" (cold water), there are also a few warm areas of "ease" (pee). Such was the case for me and my LED problems; for over a week I floundered among various deeply confusing strategies for making a matrix of lights, learning about things like Charlieplexing and persistence-of-vision gags and all kinds of disheartening complication, before I found myself in a pleasantly warm pocket of surprise.
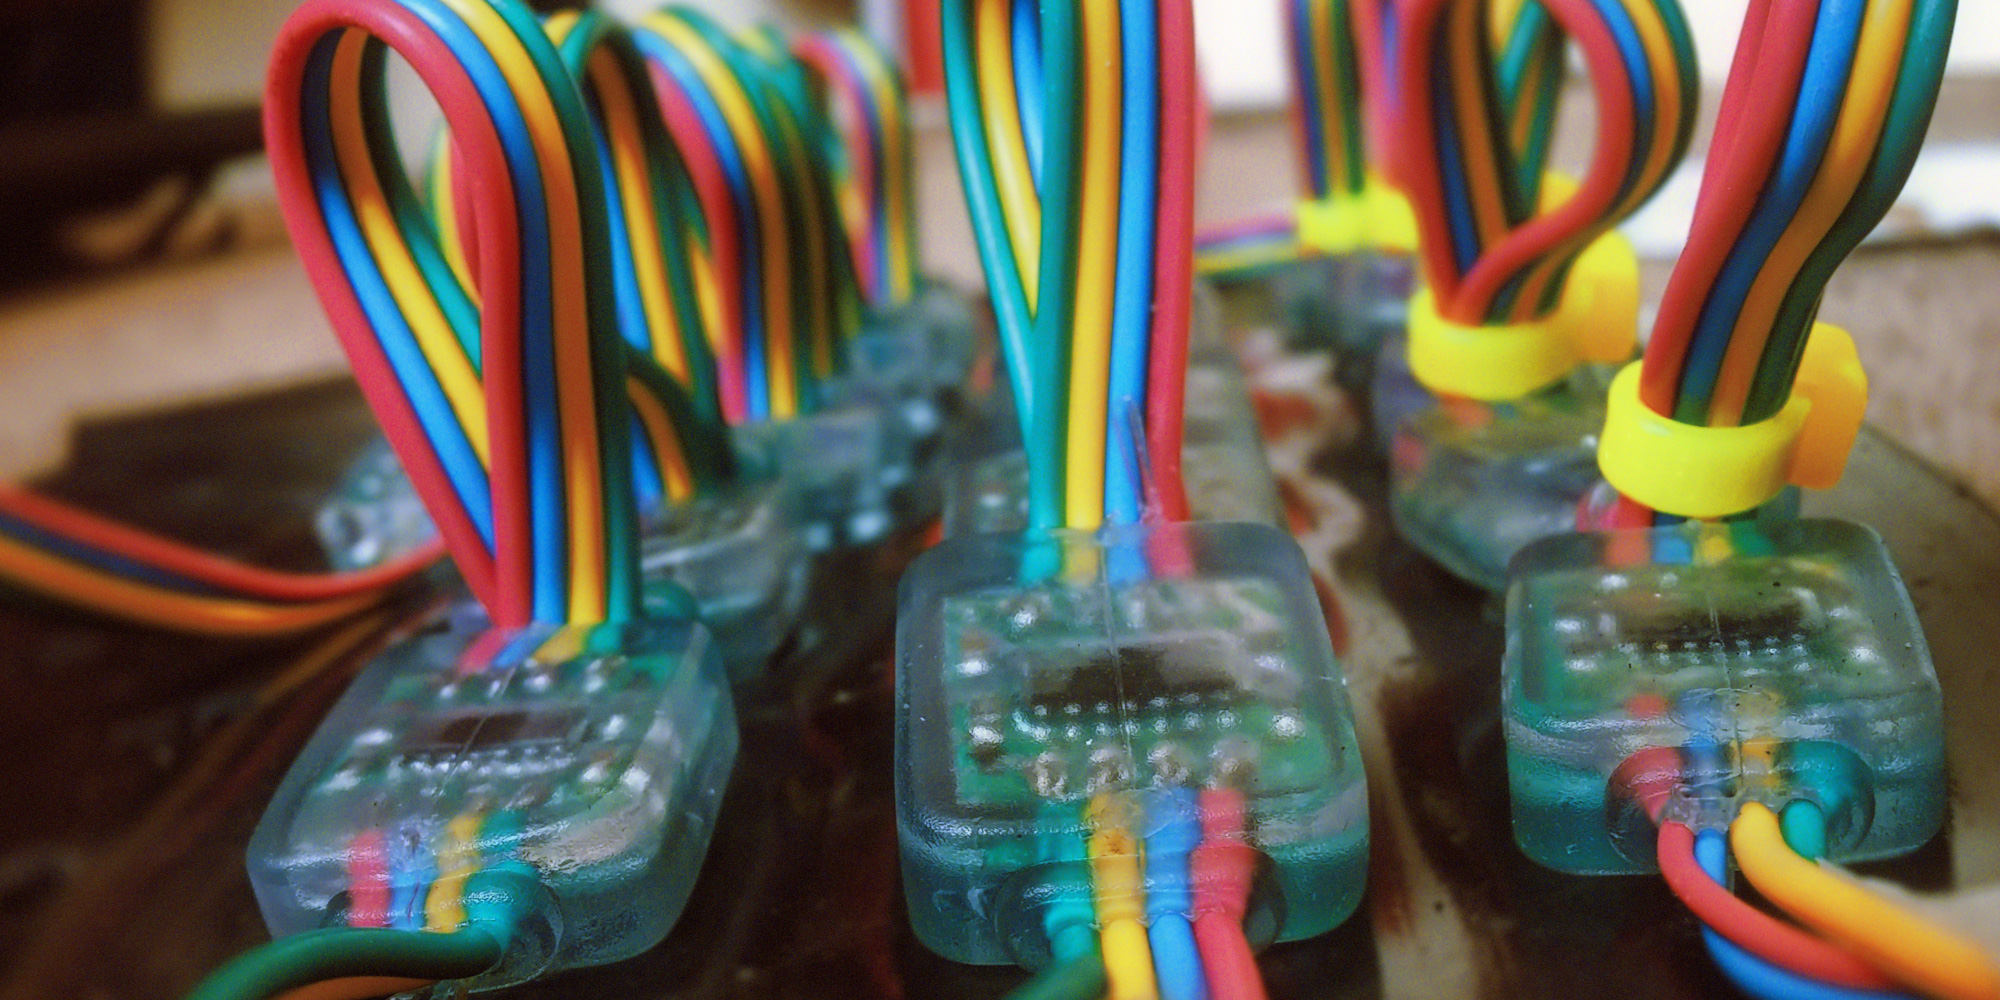
So, there are these things called Neopixels.
For anybody looking at the end result, there's not much of a difference between normal LEDs and Neopixel s; honestly, they look like a string of Christmas lights. The difference is that Christmas lights are string of lightbulbs, and the Neopixels are a actually chain of microchips; each Neopixel contains a little circuit board with a chip on it that can read digital instructions — really, each pixel is like a dumb little Arduino — and the chip controls an RGB LED.
The salient feature of Neopixels is that the first pixel knows it's Pixel 1 and the next one knows it's Pixel 2. Thus, instead of sending a signal to each light individually, you send signals for all of the lights into Pixel 1, at which point Pixel 1 takes the first signal for itself and passes the rest along.
With this one stroke of surprise luck-pee, I'd gone from a idiocy-based plan that required at least 147 wires to a Neopixel-based plan that would only require 4 — a red one for power, a blue one for ground, a green one for timing, a yellow one for data. I bought two strings of 25, I connected them end to end; I got them to work the first time I tried.
A two-week drumroll snapped to silence. First problem solved. Oh yeah. This was happening.
Up until this point, everything I had ever done with electronics had been included in the little starter kit my Arduino came with; minor blinky contraptions assembled on cheap plastic circuit boards. My attempt to make a buzzer buzz was unsuccessful. I still hadn't actually done anything, save for doodling in a notebook and filling a folder with the bookmarked secrets of the universe.
And yet — ordering electronic components off of the internet like a person. Dig me, right?
In the same online order that bore my Neopixels, I’d snagged an exploratory handful of trinkets I thought I might need: nice knobs (and the potentiometers I’d mount them on) for adjusting player colors and picking where to drop a tile, big red button for tile-dropping, chrome toggle-switch for turning the game on, and a soldering iron for binding the metals of Earth at 700° Fahrenheit.
That first order was a little nerve-wracking. Neopixels aren’t cheap and I was buying two strands of ‘em sight-unseen, and even the smaller items were intimidating; I had never put a knob on a potentiometer before, so I wasn't certain I'd matched the sizes correctly; I bought the pots after doing no math at all, so adjusting voltages at the right level was a shot in the dark; plus I wasn’t completely certain about what to expect from a button. It all felt quite a bit like being Harry Potter and walking through Diagon Alley for the first time, picking up magic items at random, hoping they're the right ones... and that's just the components; there's a second kind of nerves reserved for purchasing tools that get incredibly hot and do things with molecules.
T he order arrived , the Neopixels worked. The knobs fit snugly on the pots, the pots were the right resistance, the button was less intimidating in person. (The soldering iron stayed in the bag for a while, though.) I looked to the road ahead — I’d need a box; I’d need to make a grid of Neopixels; I’d need to mount knobs and buttons and toggles; I’d need to teach myself how to solder without dying. Troublingly, I’d also need to teach a computer Connect Four using a language of pure logic.
Somehow.
· · · · ·
Computer code is a lamentable red herring. It's the only part of the whole human project known as "programming" that most humans will ever see, and its primary role for them will be as the barrier to entry — a shame, because code is to programming as walls are to the view.
What's really happening when we program is debate — the use of logic to make a point so soundly that no argument beats it. Software bugs are holes in your argument. Malicious hackers are jackass pundits twisting your words out of context. Good programming is foolproof wording.
None of which I knew until I was good and deep into the Arduino programming language; a stripping-down of an older language called "C." The language — the code — is just some learning; just some terminology and syntax, like anything else. The fun part is the thinking, the use of logic as canvas and brush, the thought experiment; “ if you had to teach an alien how to play Connect Four using only languages the alien understood, could you actually establish it all from scratch? ”
You could — and, that’s all you have to do.
It should be mentioned that I had no idea what I was doing throughout the whole programming process. Connect Four was my first coding project, and it was like getting a boulder to the top of a mountain; first you start, and then the trick is not to stop. The version of events presented here is summarized and significantly streamlined to tell the story of what worked, but I'd be remiss not to mention the innumerable setbacks that I'm glossing over — how sometimes I’d push the boulder miles and miles into a dead-end, or dead-lift the damn thing up a cliff face only to discover that there had been a ramp right next to it. First you start, and then the trick is not to stop.
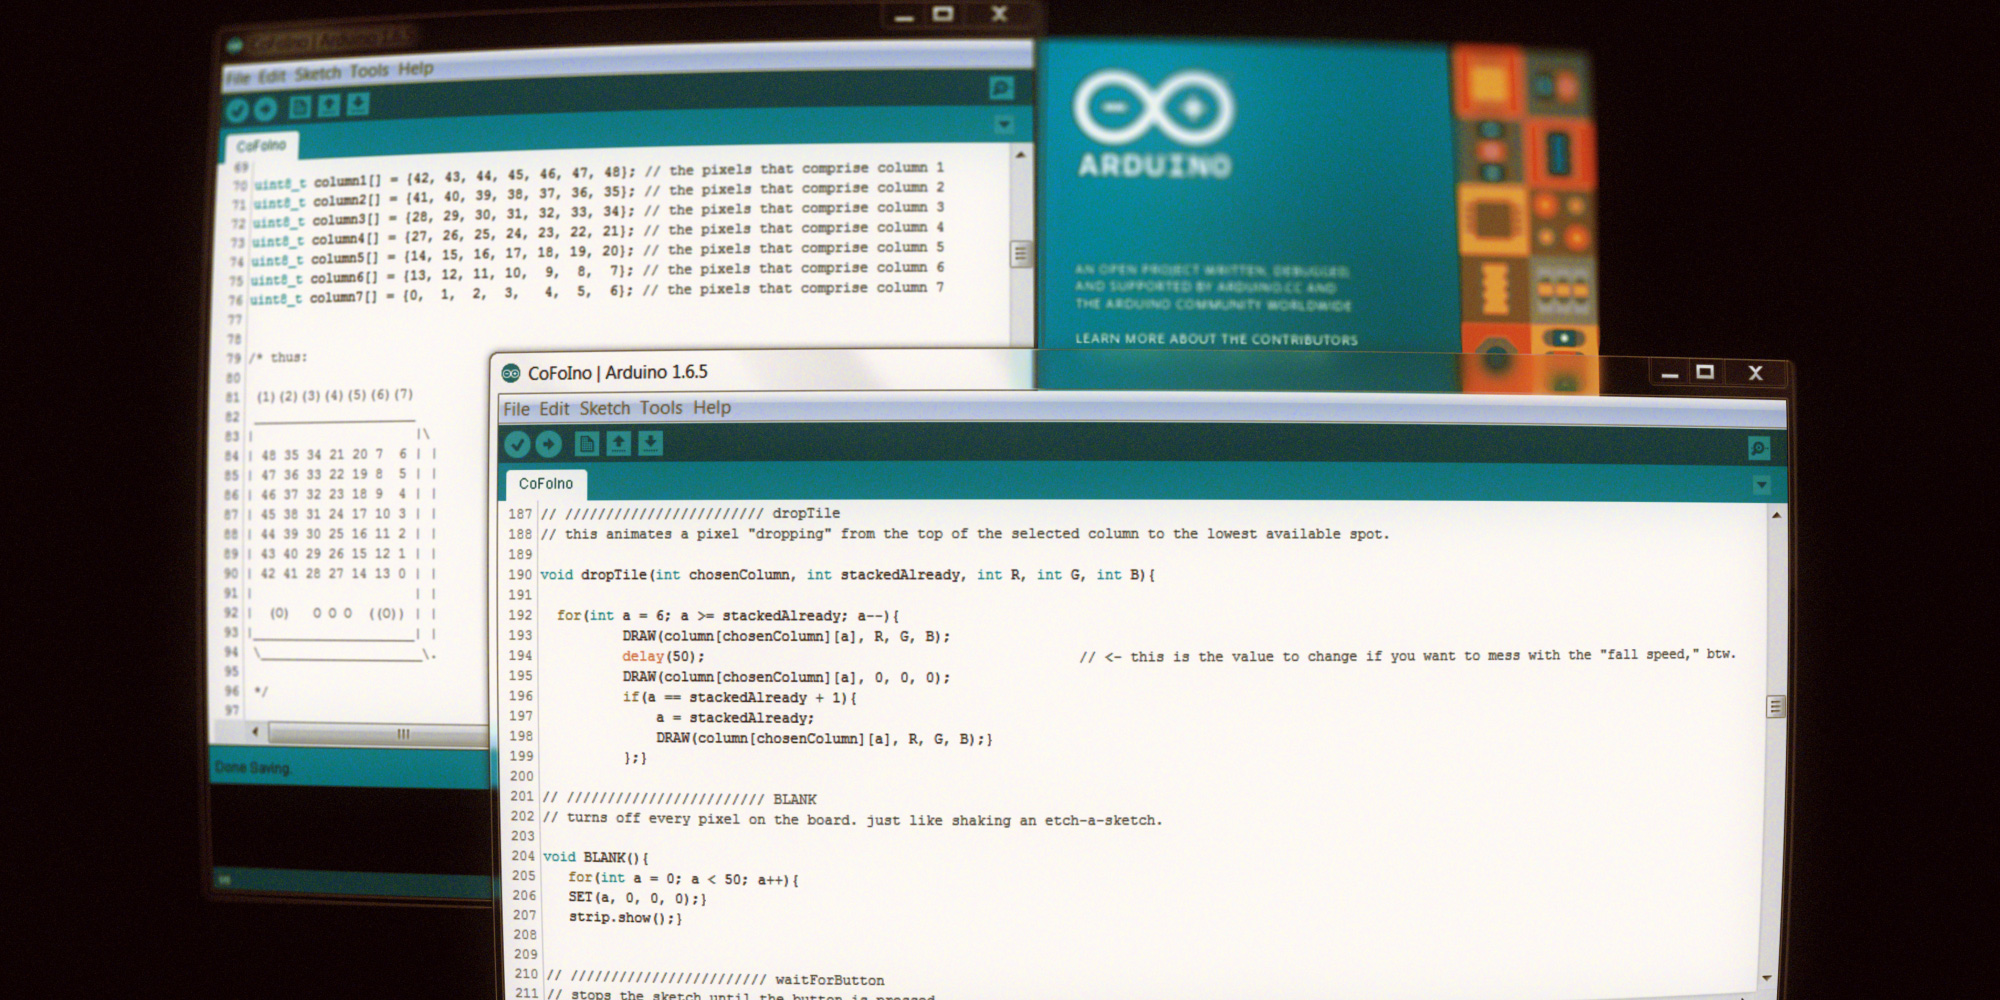
I had 50 Neopixels in a string, and I wanted to be working with a 7x7 grid. The plainest solution would be to cut my string into seven strings with seven lights each and address individual pixels by saying, "okay, you , pixel two on the third string," or something along those lines. I didn't actually use this strategy — I didn't feel like hacking up my new gizmos — but I did simulate it, because I definitely wanted the ability to address individual pixels that way. I decided to abandon the built-in numbering system on the pixels and create a little set of instructions that would allow me to "work" within a grid system like that, and then at the last minute convert my grid coordinates back to Neopixel-ese. I went with [rows][columns] for horizontal/vertical, starting from the bottom left corner — so [1][1] would mean "bottom left," [7][7] would mean "top right," [1][7] would mean "top left," and so on. Meanwhile, with my little set of instructions, I could tell the Arduino to light up pixel "[7][1]" and it would automatically translate that to "Neopixel 0."
Once I had an addressable grid system — really, a low-resolution monitor — I could start fiddling with the actual game logic.
The game, as envisioned: once turned on, the pixel matrix would display a big "P1" for player one, and three little knobs would be adjusted RGB-style to change P1's color. Once settled upon, player one would press the big red button, and the screen would provide the same opportunity for P2; then, once the big button was pressed again, the game would start. The gameplay would involve a single indicator light at the top of the screen, showing the color of the current player, which could be moved from left to right using a big twisty-knob. Once the light was placed over the desired column, the player would mash the big red button, and that light would "fall" down into place as if it were a tile in a Connect Four frame. The indicator light would re-appear, this time in the other player's color, and the “select, drop, alternate’ process would repeat until somebody won.
At the end of the day, these logical hurdles are fairly easy to clear: there's only two players, there's only six spots in each column for the tile to fall to, the columns don't need to know anything about each other (until we start talking about detecting wins), and all that color-picking stuff was really a wishlist item — the game would work with pre-set player colors, who called this a democracy? I arrived the following strategy: this game is really just updating seven lists , where each list represents one column and its contents. When the third list says “purple, green, green, purple,” the third column of Neopixels lights up in just such a way. With a strategy like that, I wouldn’t even have to think of it in terms of a game; it was just a data-entry utility for building lists.
That works , I thought.
Any human trying to imagine Connect Four will not struggle; pure logic, on the other hand, requires some groundwork to be laid, and this is where the "programming as presenting an argument" metaphor comes in. For instance, one of the simplest mechanics of Connect Four — tile drops, tile stops on top — is actually a fairly complex pile of givens. Tell your tile to drop; it won't know what you mean. You’ll teach it that "drop" means move down, and explain how fast it should go. Tell the tile to drop; okay, now it will drop… right off the matrix and into the unseen forever. Tell the tile to drop and then stop after six moves; okay, it will, but the next one will do the same thing and overwrite the first. This game of iterative clarity can seem pedantic; it also comes with a certain amount of comfort in knowing that something is taking you very seriously.
Here's a pseudocode version of the tile dropping. You can read it.
if [button is pressed]:
define variable
_stackedAlready_ = [however many tiles are already in this column]
define variable _dropCount_ = 7 minus stackedAlready
define variable _currentPixel_ = 7
command
= [turn on currentPixel, turn off currentPixel, redefine currentPixel =
currentPixel minus 1]
repeat command [dropCount] times
command
= [tell memory that this tile is here now, redefine stackedAlready =
stackedAlready plus 1]
In English, that would say:
When the button is pressed,
since you know how many tiles are already in this column,
you
can subtract that number from 7 to know how many "drop" movements
we'll have to make.
We'll start falling from a height of 7.
To
"fall," we're going to blink pixel number [current#], and then
subtract 1 from [current#]
and
repeat that process several times; blink [current#], subtract 1 from [current#],
blink [current#]...
Once
we stop, we'll update the memory so it knows we're here, and update the
tile count for this column.
Establishing the necessary givens; building them up in baby steps to arrive at a framework of agreement; turns out, this modern technology of microchip programming is pretty much Socratic.
I worked through little clumps of logic in exactly this way, building the individual tools I’d need to eventually “explain” the game to the computer — function to convert coordinates into Neopixel numbers, function to save a player color, function to update seven lists, function to drop a tile to the lowest empty place in a given column, function to switch players — testing them from time to time on my unruly rat-king of Neopixels. Once I’d gotten every little function to work on its own, that means I’d built up enough “vocabulary” to lay out game behavior in discrete steps: “first you run the ‘pick a player color’ function, and when someone presses the button you save that color for player one, then you run the ‘pick a player’ function again, and when someone presses the button again you run the ‘show the indicator light’ function, and then you run the ‘move the indicator light around based on what the knob is doing’ function,” and so on.
I Googled. I made headway. I left paragraphs of explanation and big ASCII diagrams in my code.
The programming started to come together, and — to my surprise — it quickly became fun. It also became very useful; I found that what I was learning in the Arduino programming language was remarkably similar to all the expression languages I had never bothered to learn for all the other software in my life. I was getting better at my day job with each passing day; I even learned how to make Excel do all the fancy Excel things.
As my program increased in functionality, my knot of Neopixels decreased in acceptability. It’s not ideal to program a grid of lights being held by a pillow; what you’d want for that job is a box.
· · · · ·
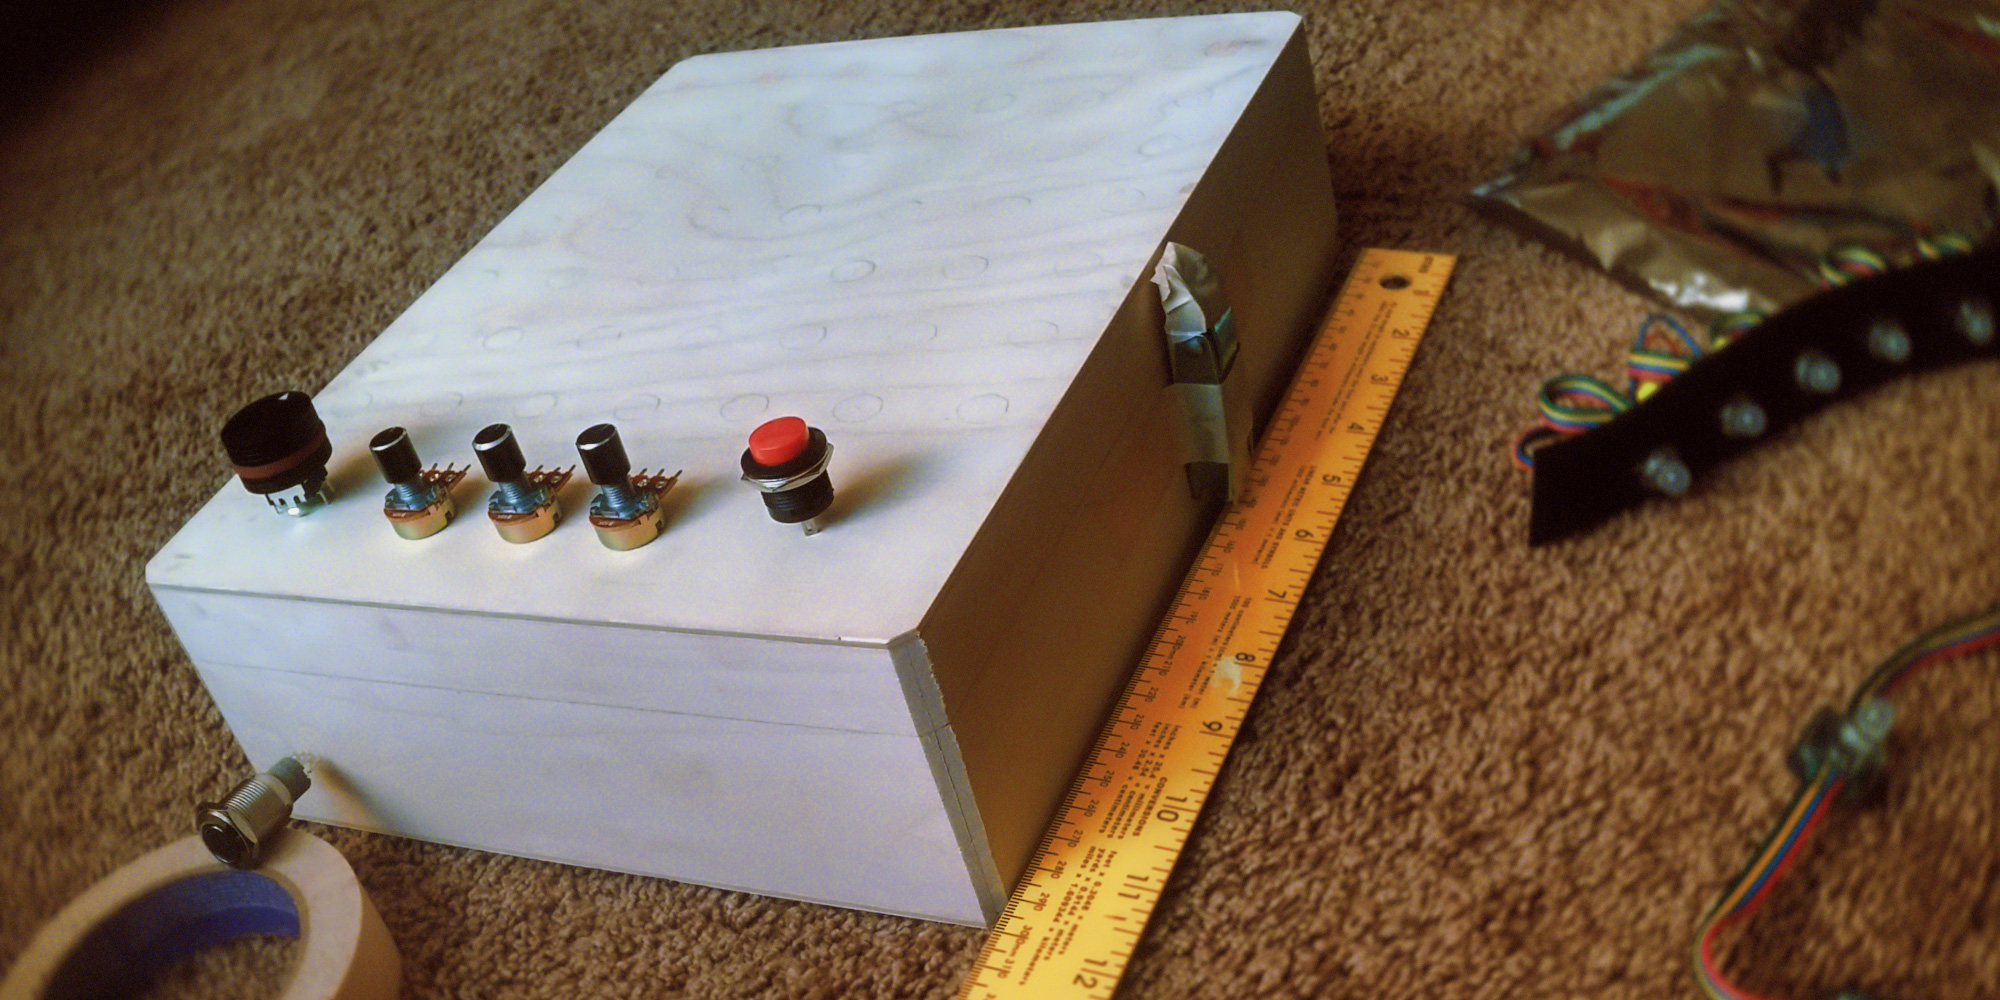
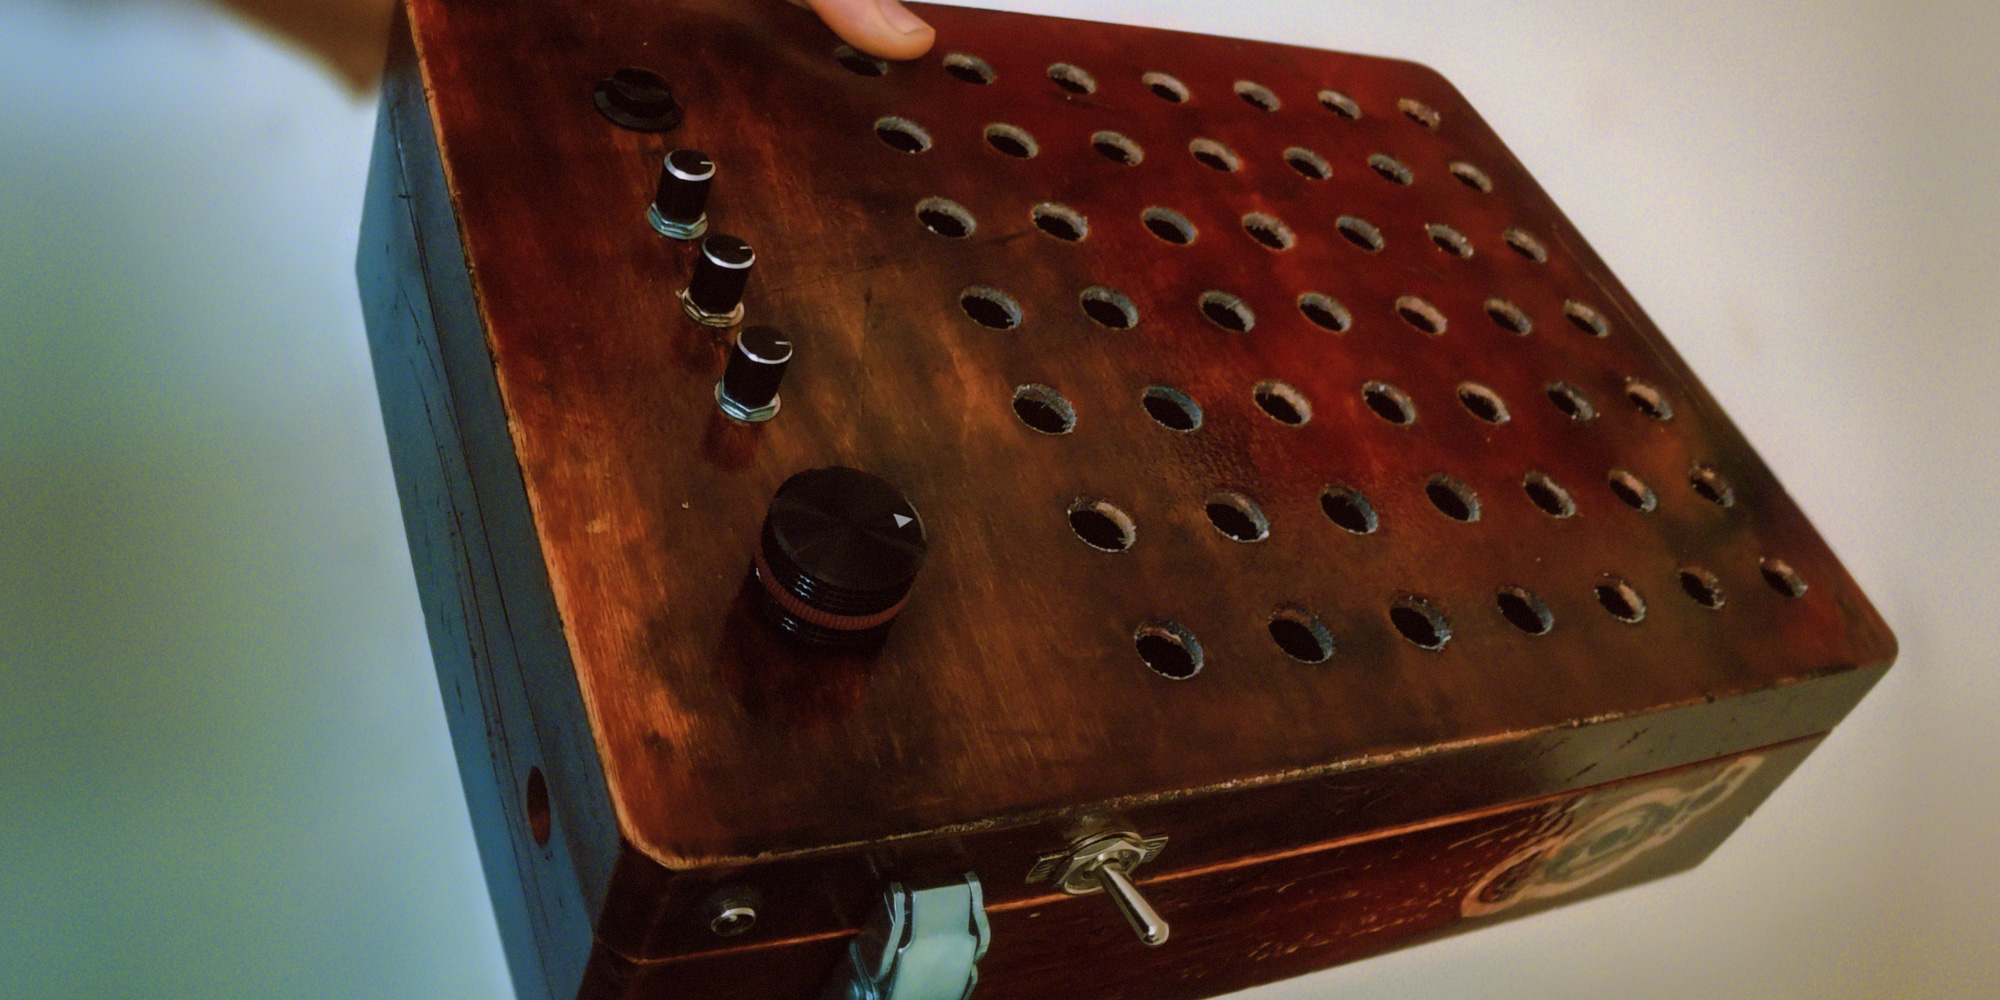
I went to a craft store and found a box; VCR-sized, hollow, opened like a book, cheap. Sold.
A brief word about drilling holes in a cheap box. I knew that my Neopixels would require a 3/8" bit, and my first attempt at drilling made use of a "normal" drill bit at that diameter. Anyone following in my footsteps should know that what happens next is a supersonic collision between the box and the drill, which is a mistake that costs however much a box costs. A spade bit is the way to go for this; cleaner holes, saner drilling. Throw a printed grid onto the box, Sharpie a little dot through all the intersections, and nestle the spade bit into the dots. Drill, plunge, repeat.
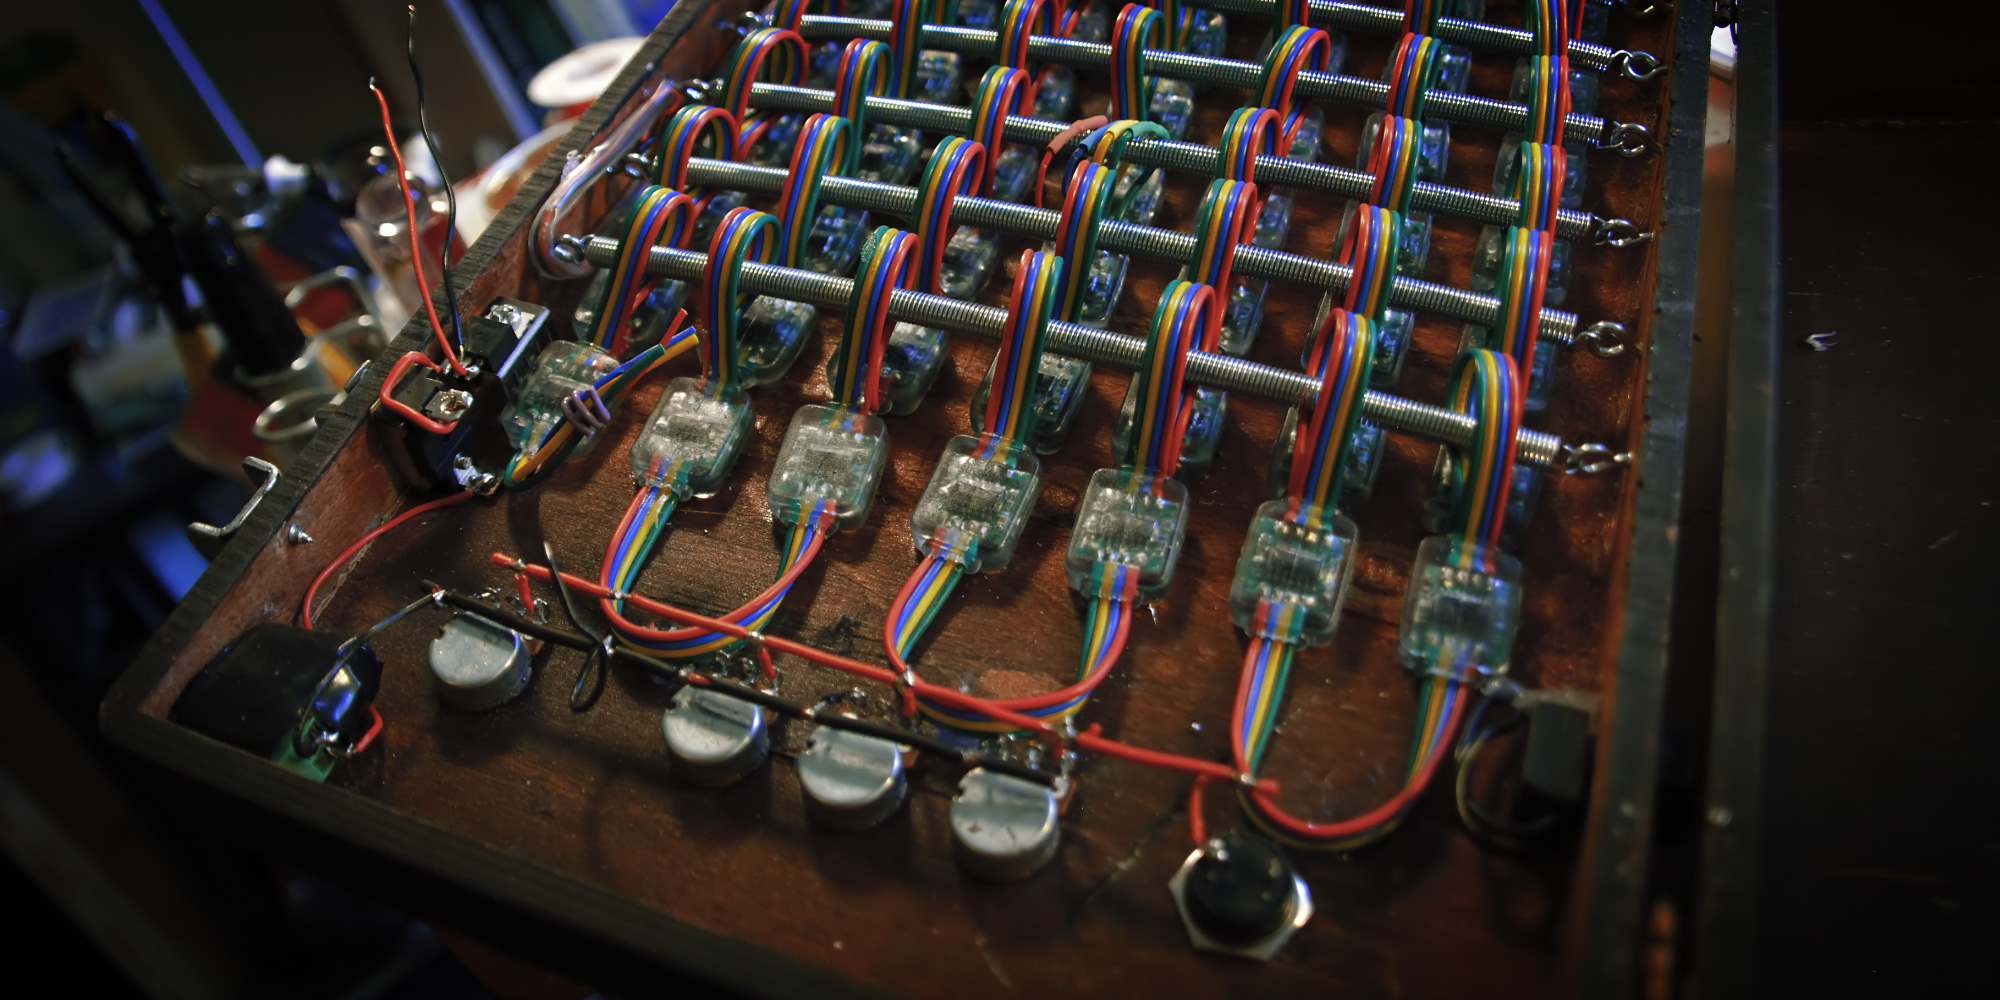
I went through over a dozen arrangements of buttons and knobs before settling on a layout I liked; thusly determined, spade-bit holes to match were popped into the box and components were finger-tightened into position. The Neopixels were temporarily added; they grabbed on tight. I punched a couple of holes in the side of the box for power components and added a giant comedy-sized "draw hasp" to keep the halves of the box locked together. (That’s one of those Pelican-case-style latches where you pull one tab over the other and it snaps down into a locking position.) My giant comedy-sized toggle switch was installed next to my giant comedy-sized draw hasp, bringing the chrome-ish protuberances to two and the external assembly to its completion.
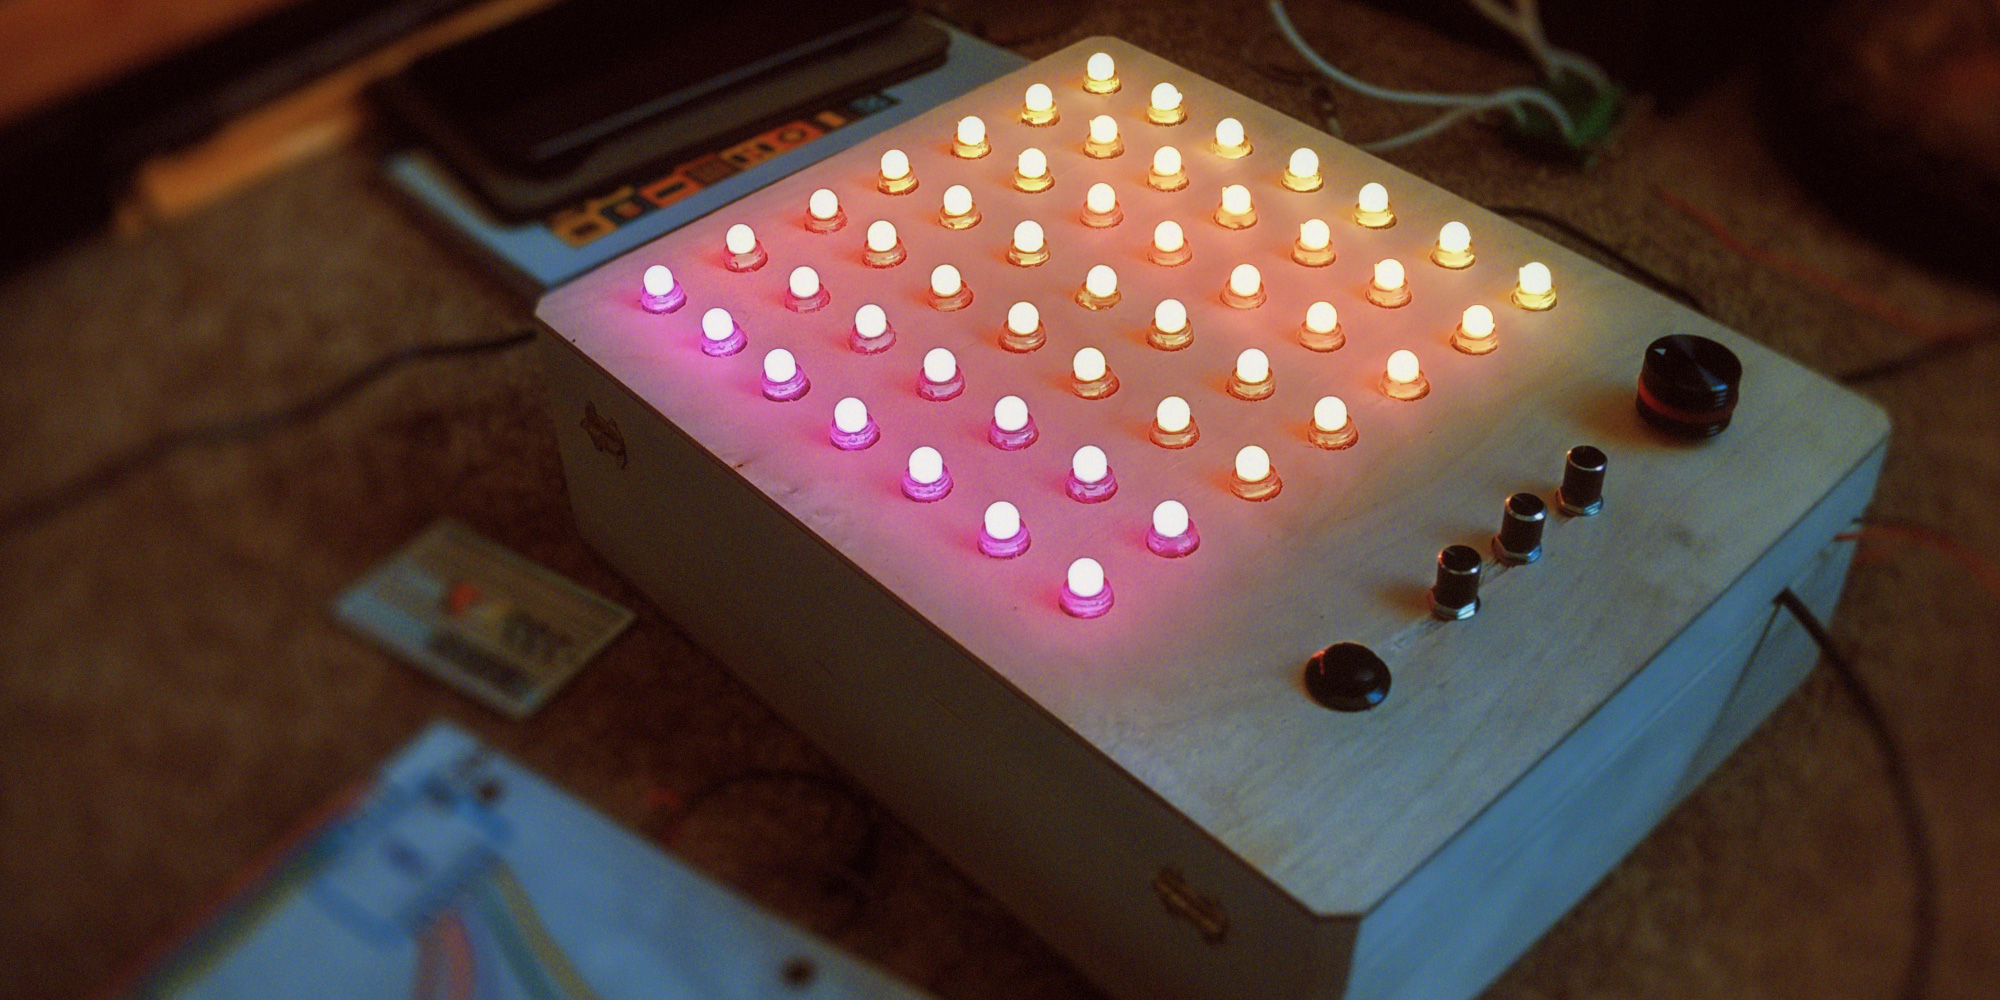
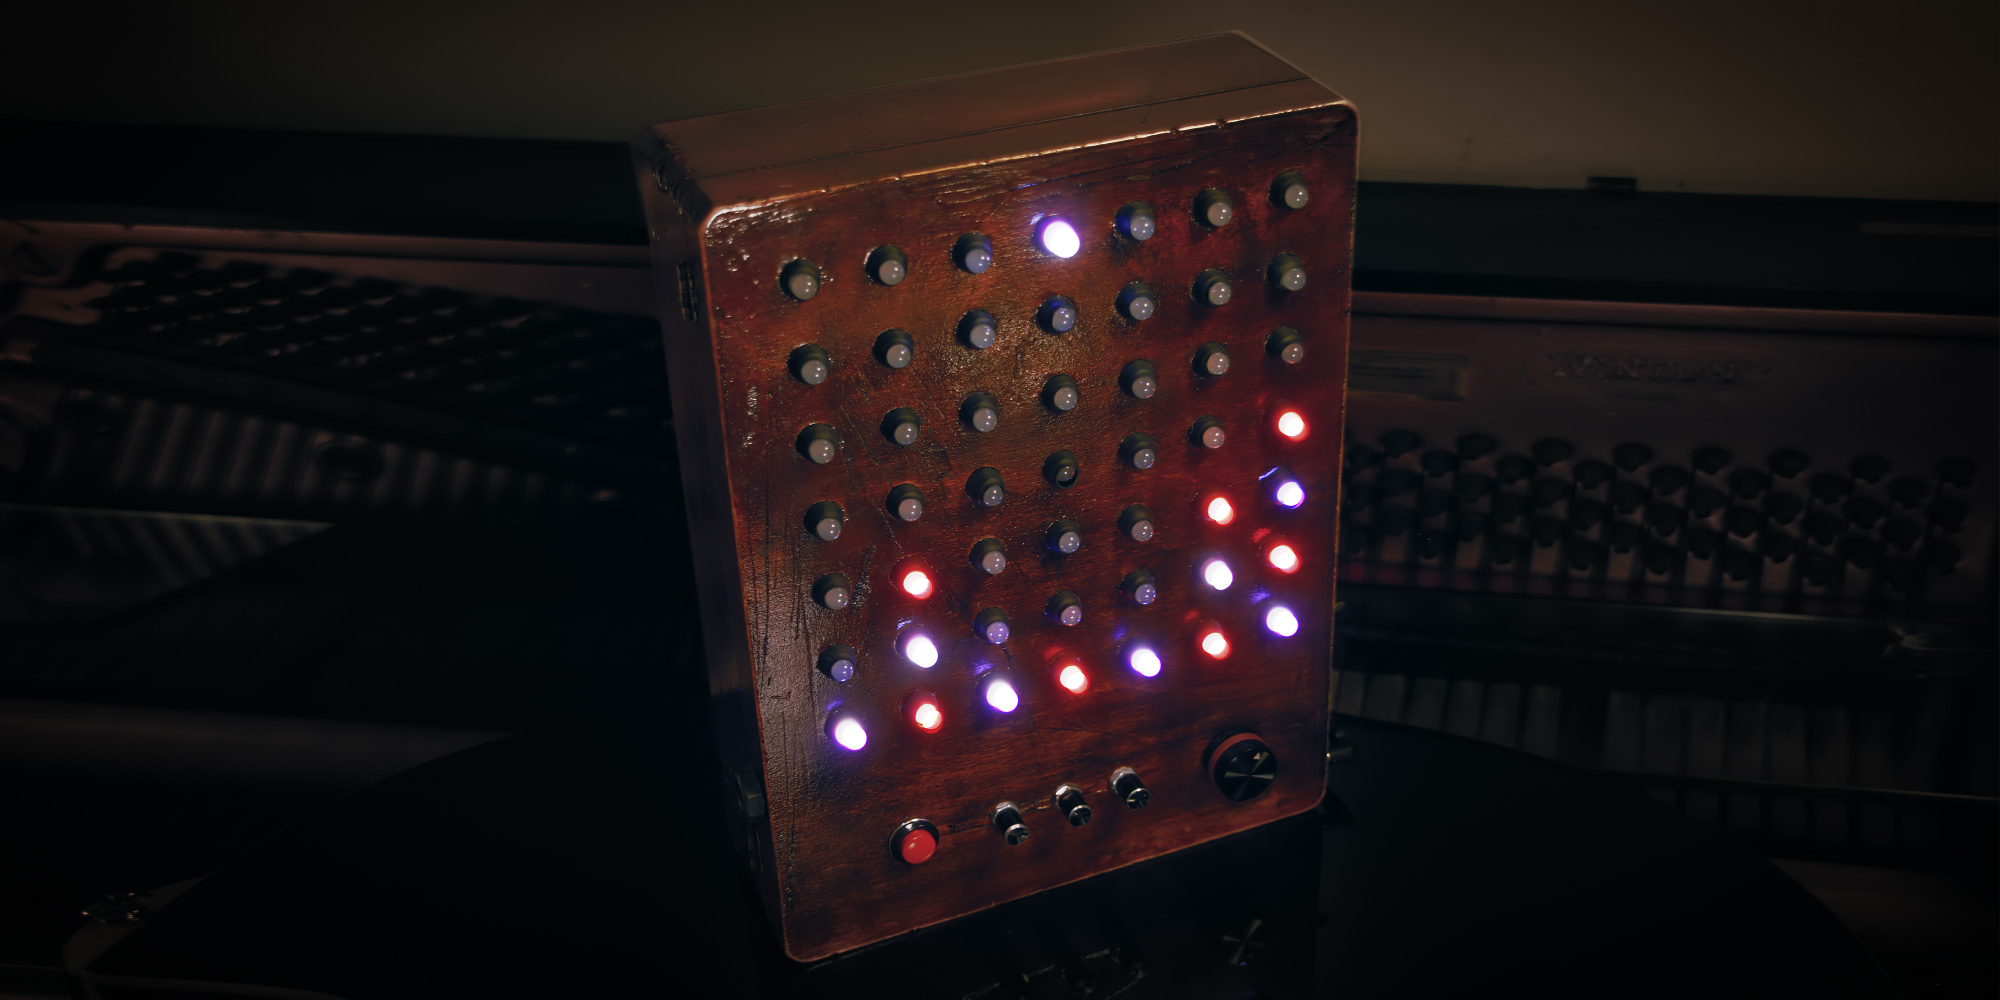
Then I threw an Arduino into the mix to see what the thing would look like with lights on; I banged out a quick program to make the lights do something, and I watched the lights actually do it. The pure satisfaction of this moment is difficult to convey. It would have been totally premature to scream “ Eureka! ” and run naked into the streets, so I didn’t; on the other hand, no jury would have convicted me, because holy shit my glowing box.
"That looks like a real thing almost," I marveled. I stared into the light like a Spielberg character.
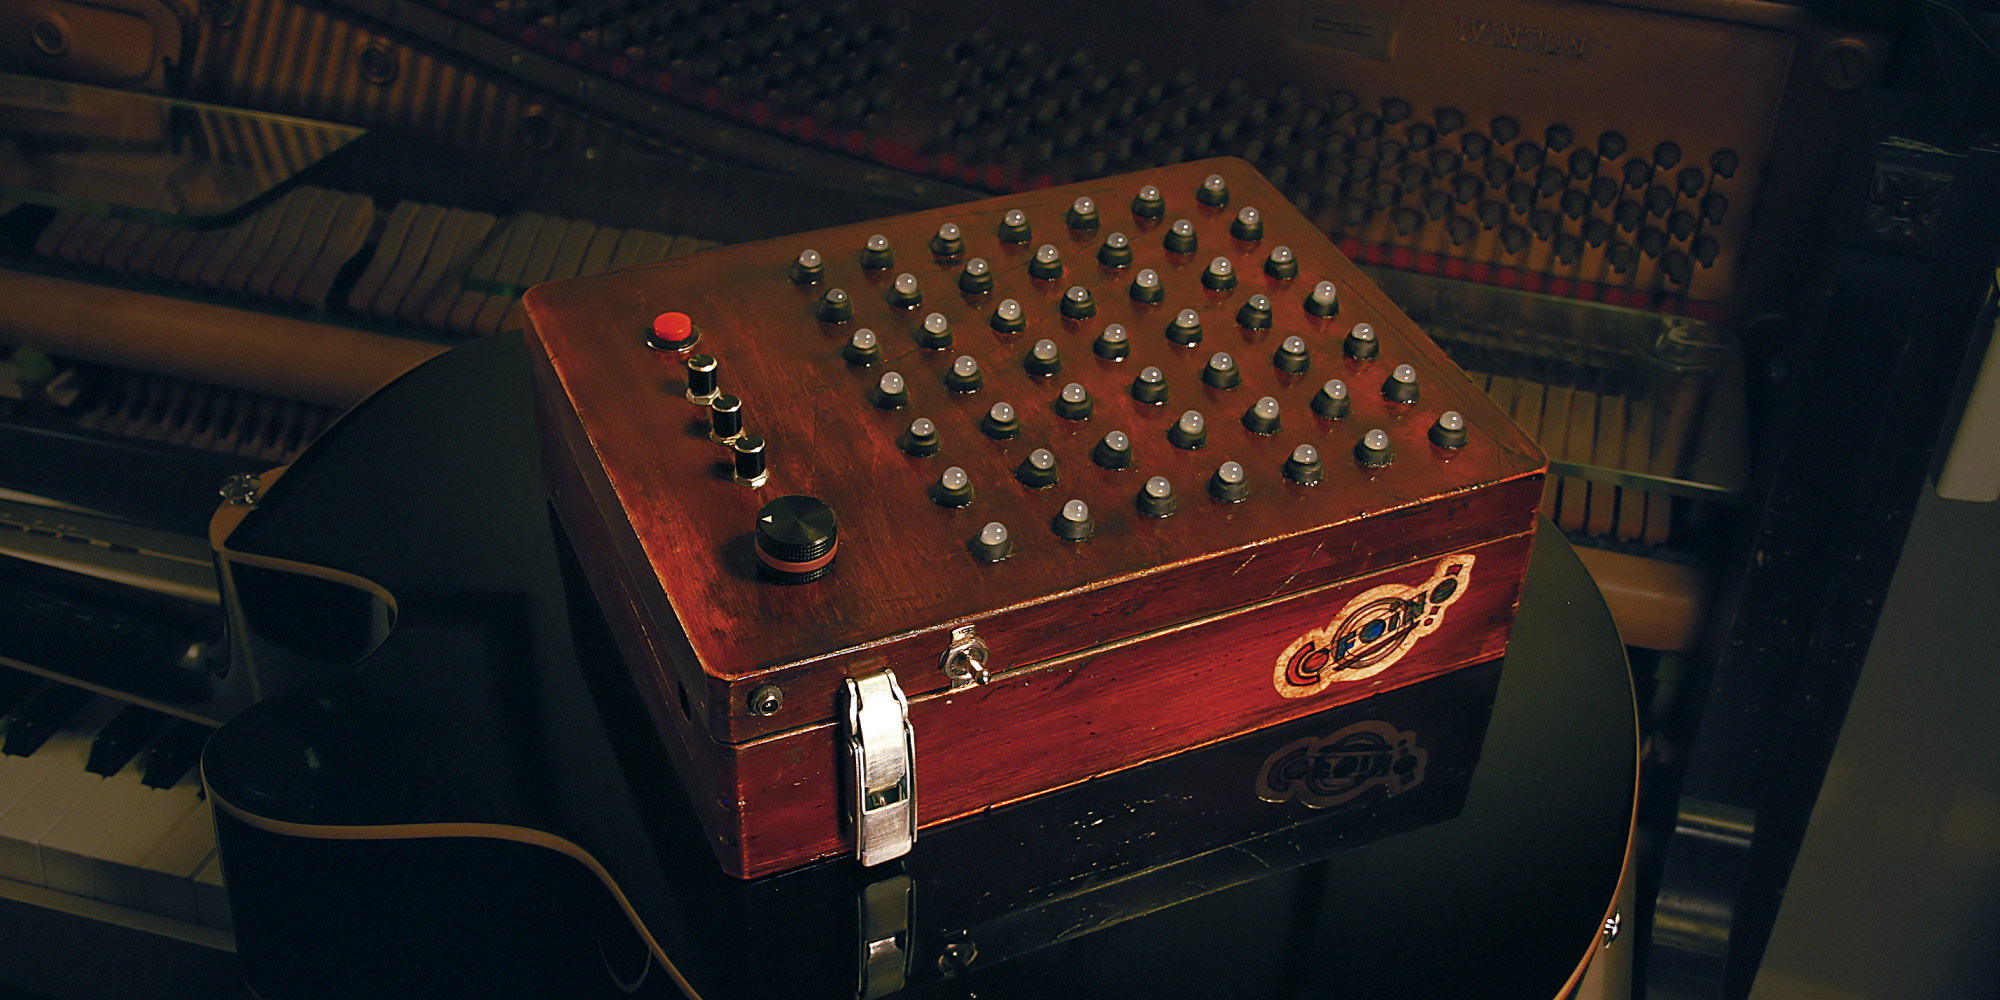
After taking the bits and pieces back out of the box and sanding everything, I treated the wood. The first thing I did was give everything a couple coats of stain, which is a sticky affair that can be affectionately thought of as kamikaze for brushes; a couple days later, dried and pungent, the box was attacked with a fork. My idea was to give it an artful coat of faux-antique wear and scratches first and then cover those bruises with a glaze-y finish on top, in a way that doesn't actually make sense as a replica of antique things but looks cool. I tore little nooks and scrapes into the wood on all sides, then I re-sanded the edges and anywhere that would have been "handled" a lot over the "lifetime" of the thing. I went in opposing directions with their contrast — the sanded and worn edges were left brighter than the surroundings, showing the original butter-colored wood instead of the stain; the scrapes and gashes were gooped with black acrylic paint and wiped off, leaving them dark and striking.
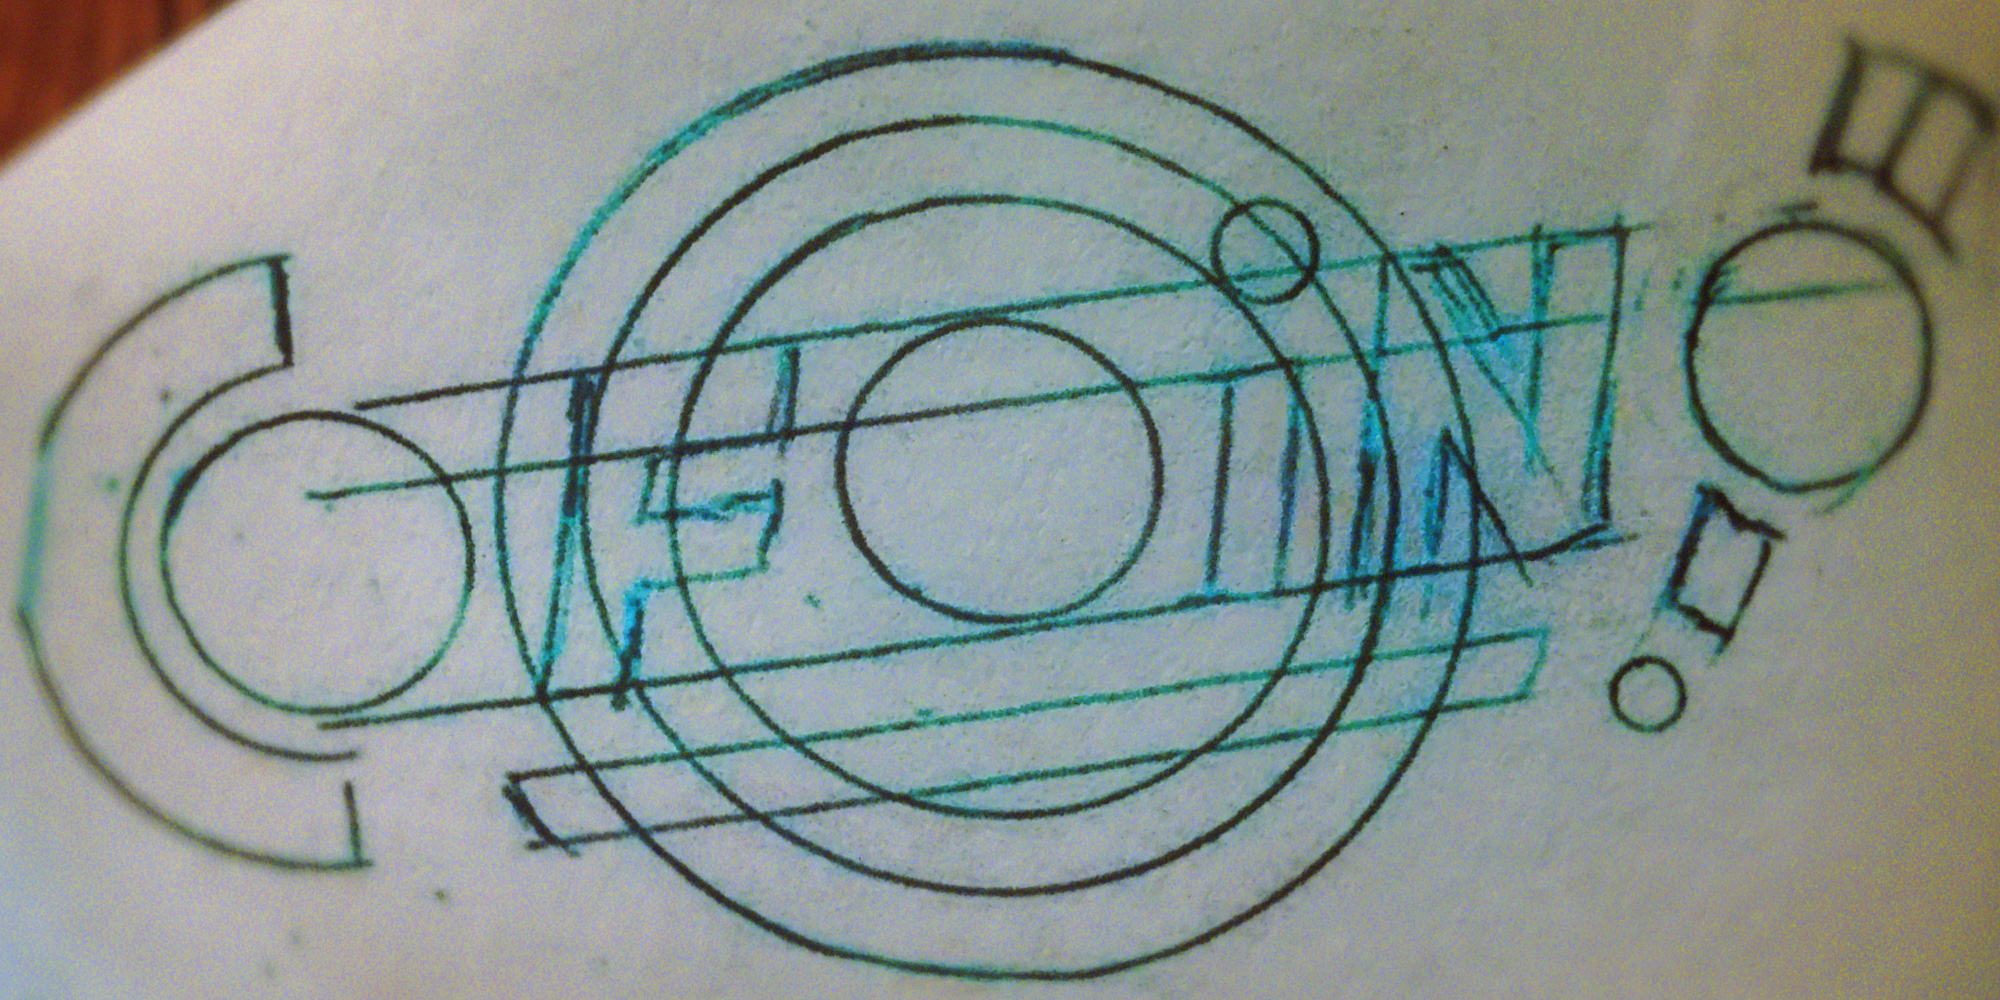
At first I wanted my relic to look like a real product that happened to be seventy years old, which would mean including a period-appropriate logo that would have been professionally applied at the time and weathered since. I started sketching out designs for such a logo, but stopped halfway through the second one — the sketch was cooler than the logo was going to be. The guideline rings looked cool with the intersecting scrapes of the text's x-height and base lines; the whole thing felt very authentic and "drawing-board"-y. I decided the sketch itself would be the logo, and that the actual (fake) history of this game was not that it had been a “real product,” but that it had been a proof-of-concept thing that was being passed around the engineering department as a potential product and someone had slapped this half-assed logo on the side immediately before presenting the game at a meeting where the company rejected it, leaving behind just the one prototype.
You spend a long time on a project, you start telling yourself stories about it. Whatever.
I had been calling my game the “ Connect Fourduino” during the previous weeks; it became “ co-fo-ino” while I was sketching logos and having fun with "o" shapes, and I eventually settled on the stylization “ CoFoiNo,” with an all-important minuscule "i" for visual balance and hint that it's not a lowercase "L." I'm aware that it might read "Co- Foi -No" to some, and I have decided that I'm gonna spend the rest of my life explaining myself anyway, so... you know, damn the torpedoes.
(If I had this whole process to do over again and could only change one thing, I wouldn't add any color to the logo. I second-guessed my instinct to have the logo be just a sketch and threw in a bit of color right before applying the clearcoat — sigh. It still looks fine, but it looked cooler before.)
I opened a standing ladder in the driveway, wedged a broomstick between the rungs, and hung the CoFoiNo from the broomstick — I went over it several times with clear gloss spray. Nice, slow coats, without any polishing between; I wanted to keep the natural chunkiness of the wood under the shine. Once it was dry, it still looked wet. That's the dream you can achieve.
· · · · ·
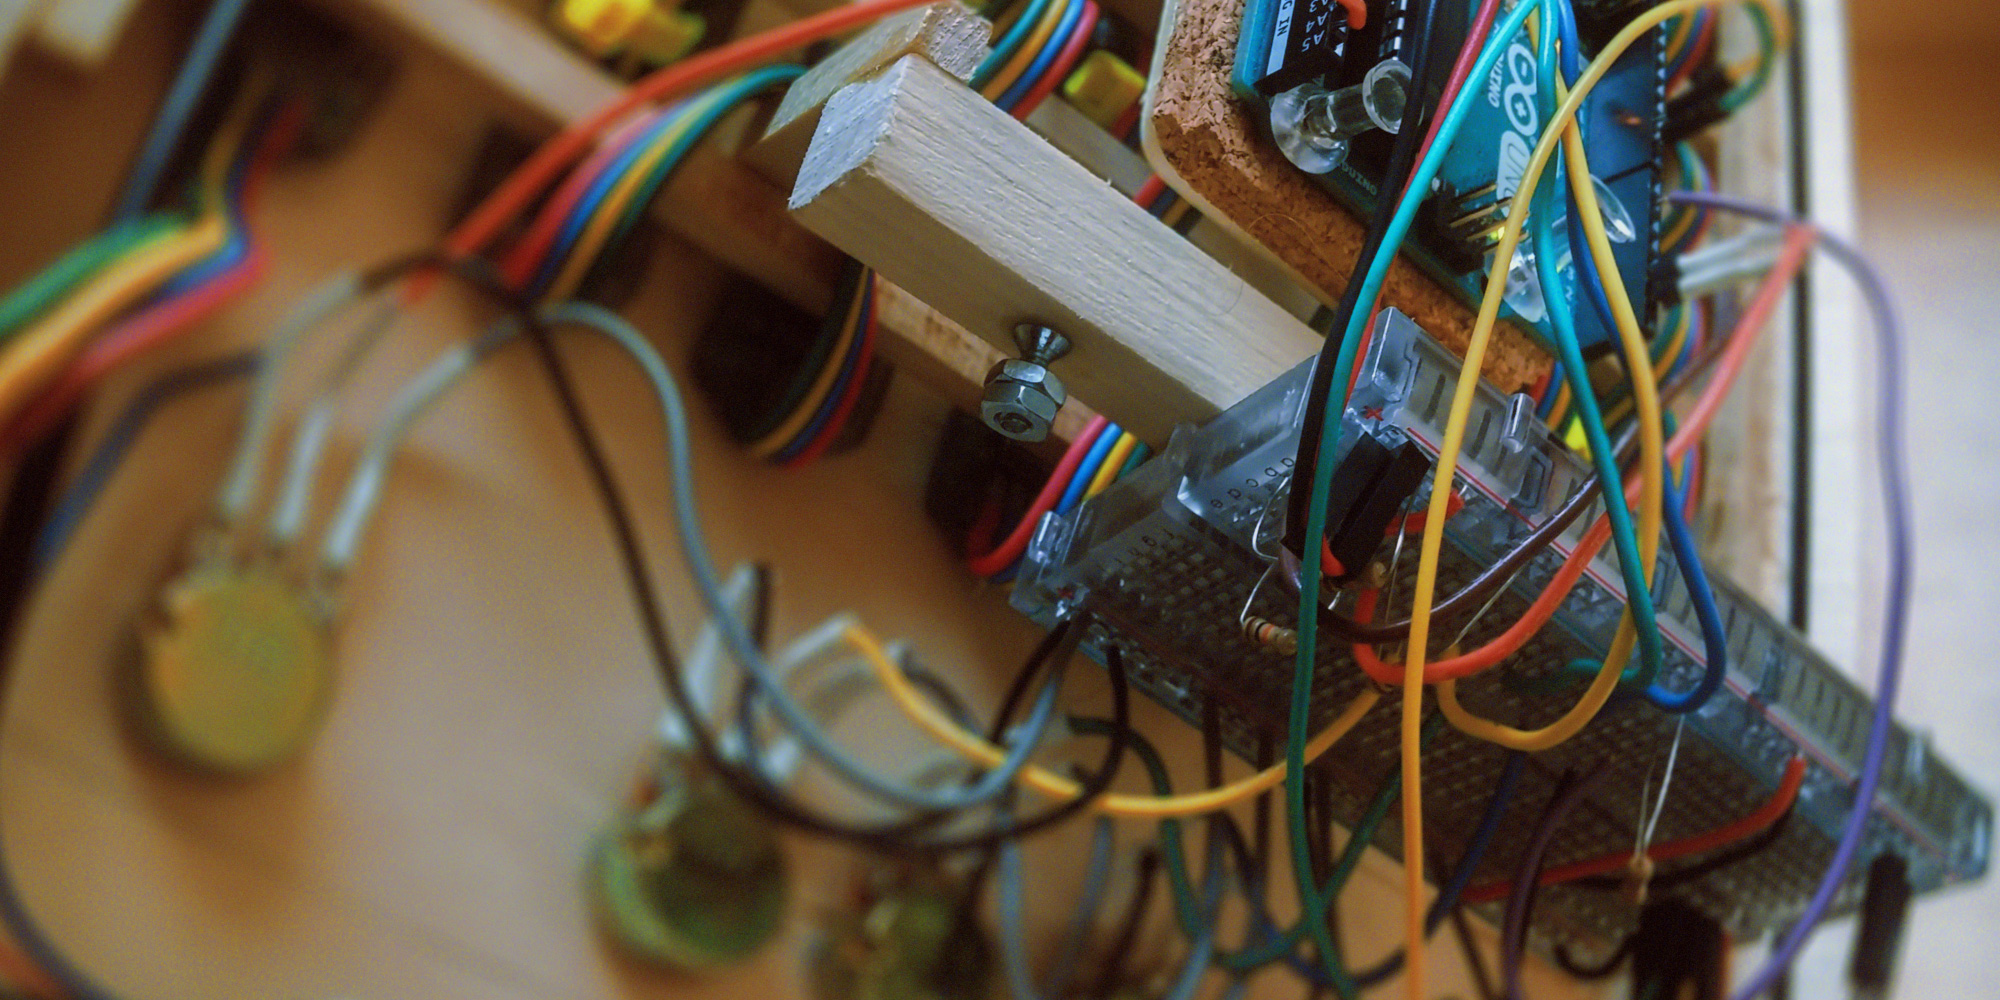
In the old days you'd just take a piece of wood you had lying around — traditionally a cutting board from the kitchen — hammer in some nails to act like little telephone poles, and string wires between the nails. We don’t use real boards for circuit prototyping anymore, but otherwise the process is pretty similar — modern plastic breadboards are a sensible pattern of temporary slots meant for jamming wires into, so you're free to change your mind for the rest of your life and never deal with troublesome matters like ‘choice’ or ‘soldering.’
There's no law in electronics that says you can't use a breadboard prototype as your permanent circuit (which is odd, because there are laws in electronics for pretty much everything else), but a circuit on a breadboard is a fairly fragile thing — for a permanent installation, you’ll probably want it on perfboard. Perfboard is a thin sheet of brittle god-knows-what with a grid of holes perf orated into it. You thread your components through the little holes, solder them to the provided copper pads, and trim the excess wire; what you're left with is a poky field of silver Hershey's Kisses, with a beautiful permanent circuit on the other side.
For the CoFoiNo, I eventually ended up with a pretty rugged prototype; it was just a simple breadboard-based junction point between all the wires coming off the control surfaces and all the wires getting routed into the Arduino, but it did everything it needed to do. That prototype got me through the whole "write some code, see if it works, try to figure out why it doesn't, do it all again" stage of the project, and it's pretty close to the final circuit, with one major exception. When your project is in the programming stage, it stays connected to the computer via USB cable; the USB cable also handles your power. Once you're done coding and ready to go out into the big world, you'll need to start wranglin’ your own electrons — and for that, you'll need to know a few things.
· · · · ·
Solder is a floppy wire made from metals with a low melting-point. You can unwind a bit of solder, push it onto another metal surface, and use something hot to "flow" melted solder onto the metal. One second later the solder cools and solidifies, leaving a permanent conductive bridge between it and the surface it's on. It's tempting to think of solder in terms of glue, and for all practical considerations that's fair, but where glue merely "holds" a couple of surfaces together, solder becomes molecularly entangled with those surfaces. In fact, as far as electrons are concerned, you've just made one piece of metal out of two — or three, or fifty, or whatever — and this one trick contains all of electronics. You start your electronics build with a bunch of pieces of metal, in the form of wires and components, and you eventually convince electrons that they're all one big piece of metal.
(FYI — nope . Consider this entire explanation a poem. None of the physics are actually like this.)
As far as the electrons know, they're exercising free will about where they'll go, based on areas they prefer more than others. This is because electrons don't know that you control the resistance; they look at an area of resistance, groan, and say, "is there an easier way across this thing?" If there isn’t, they'll trudge through the resistor and snap out the other side. If there is — when there's not supposed to be — that shortcut is a short circuit, and a swarm of disloyal electrons will jump right to the end without stopping. The problem with this is that the circuit was expecting you to engage in some basic crowd control, and now it's like The Who are playing tonight.
I apologize for reducing people being crushed at a Who concert into a symbol, but... actually, it presents a morbid alternative to the usual 'flow of water' analogy for electricity. Let's think about it in terms of crowd control and throngs of people. Our total available power coming out of the wall outlet will be the crowd at Disneyland — picture the crowd, picture a deafening mob of insane tourists in mouse-ear caps, desperate for thrills, total savages — and our little Arduino project will be a boat on the Pinocchio ride. (Which is a ride where like ten people get on a boat and are gently floated through a park decorated with miniature houses. It's the thrill-equivalent of a chinchilla thinking about a hug.) Enough members of the thrill-thirsty horde have to be diverted into the line for Pinocchio that there's always riders, but not so many that there’s more insatiable thrill-lust in line for Pinocchio than Pinocchio can accommodate.
Your job is to control the flow of riders getting onto the boats.
In this analogy, "how many people are entering the line" is equivalent to "amps," and "how overcome by ravenous insanity they are" is equivalent to "volts." Both measurements are important, and they’re important in different ways, because crowd size and crowd insanity will affect the flow of riders in different ways. We should keep an eye on both. It’s a small ride, so we hope there’s not too much of a crowd in line. It’s also a delicate ride, so we hope there’s not too much insanity in line. It’s only when there’s too many people, or when the people get on the boats and start body-slamming each other out of sheer excitement, or both, that we have a problem.
Resistance is the difficulty of a surmountable obstacle; it's also the third player in Ohm's Law, which states "voltage equals amperage times resistance." In real life, that means you can trade amperage for voltage by adding resistance. In our analogy, that means an unpleasant obstruction in the line — say, a frat guy who snuck alcohol into the park and is now vomiting on people's shoes — will definitely diminish the number of people who stay in line, which is good, the crowd shrinks, but the people who stayed will have been driven to a much higher degree of desperation.
People getting past you is bad, because that means you’re no longer controlling the flow of riders onto boats. There's two ways they can get past you: a large-enough group of people cramming into the line would trample you and swamp the boat — and you’ll never get fooled again — or an insane-enough group of people will murder you where you stand because they want the hell out of that boat ride. Size and sanity. If the boat is swamped, you lose; if there's only two passengers and they're both trying to convince the other that they're Jesus, you also lose.
That's electricity in a nutshell; controlling crowd behavior. Amps is how many people there are, volts is how insane they are, resistance is how you trade a big sane group for a small in sane one.
Ah, poetry.
Before we build the circuit for real, let’s build it in theory.
The socket in my North American wall is putting out around 120 volts, and for our purposes we can safely pretend there's infinite amperage to draw from. The Arduino I used prefers to have between 3 and 12 volts and at least a quarter of an amp; the Neopixels want exactly 5 volts and are gonna need at least an amp or two. We want to run them both off of one adapter, so we'll need to make sure our adapter is within operational limits for both.
I don’t recall what the CoFoiNo’s power supply was previously supplying power to — a guitar effects pedal, maybe? — but now it’s taking 120 volts of alternating current out of my wall socket and transforming it into 5 volts of direct current for my dumb little thing. This is one of the magnificent things about sitting down and learning electronics; suddenly, all of those old power bricks you can’t find the thing for, you’re gonna find a use for all of ‘em . There’s more to it than just volts and amps, of course, so don’t run off with this one paragraph and start plugging things into each other, but — just so you know, there are some practical upsides to making a tchotchke.
(It’s “tchotchke,” not “chotchkie,” I just learned. Thanks Merriam-Webster, for that and “emoji.”)
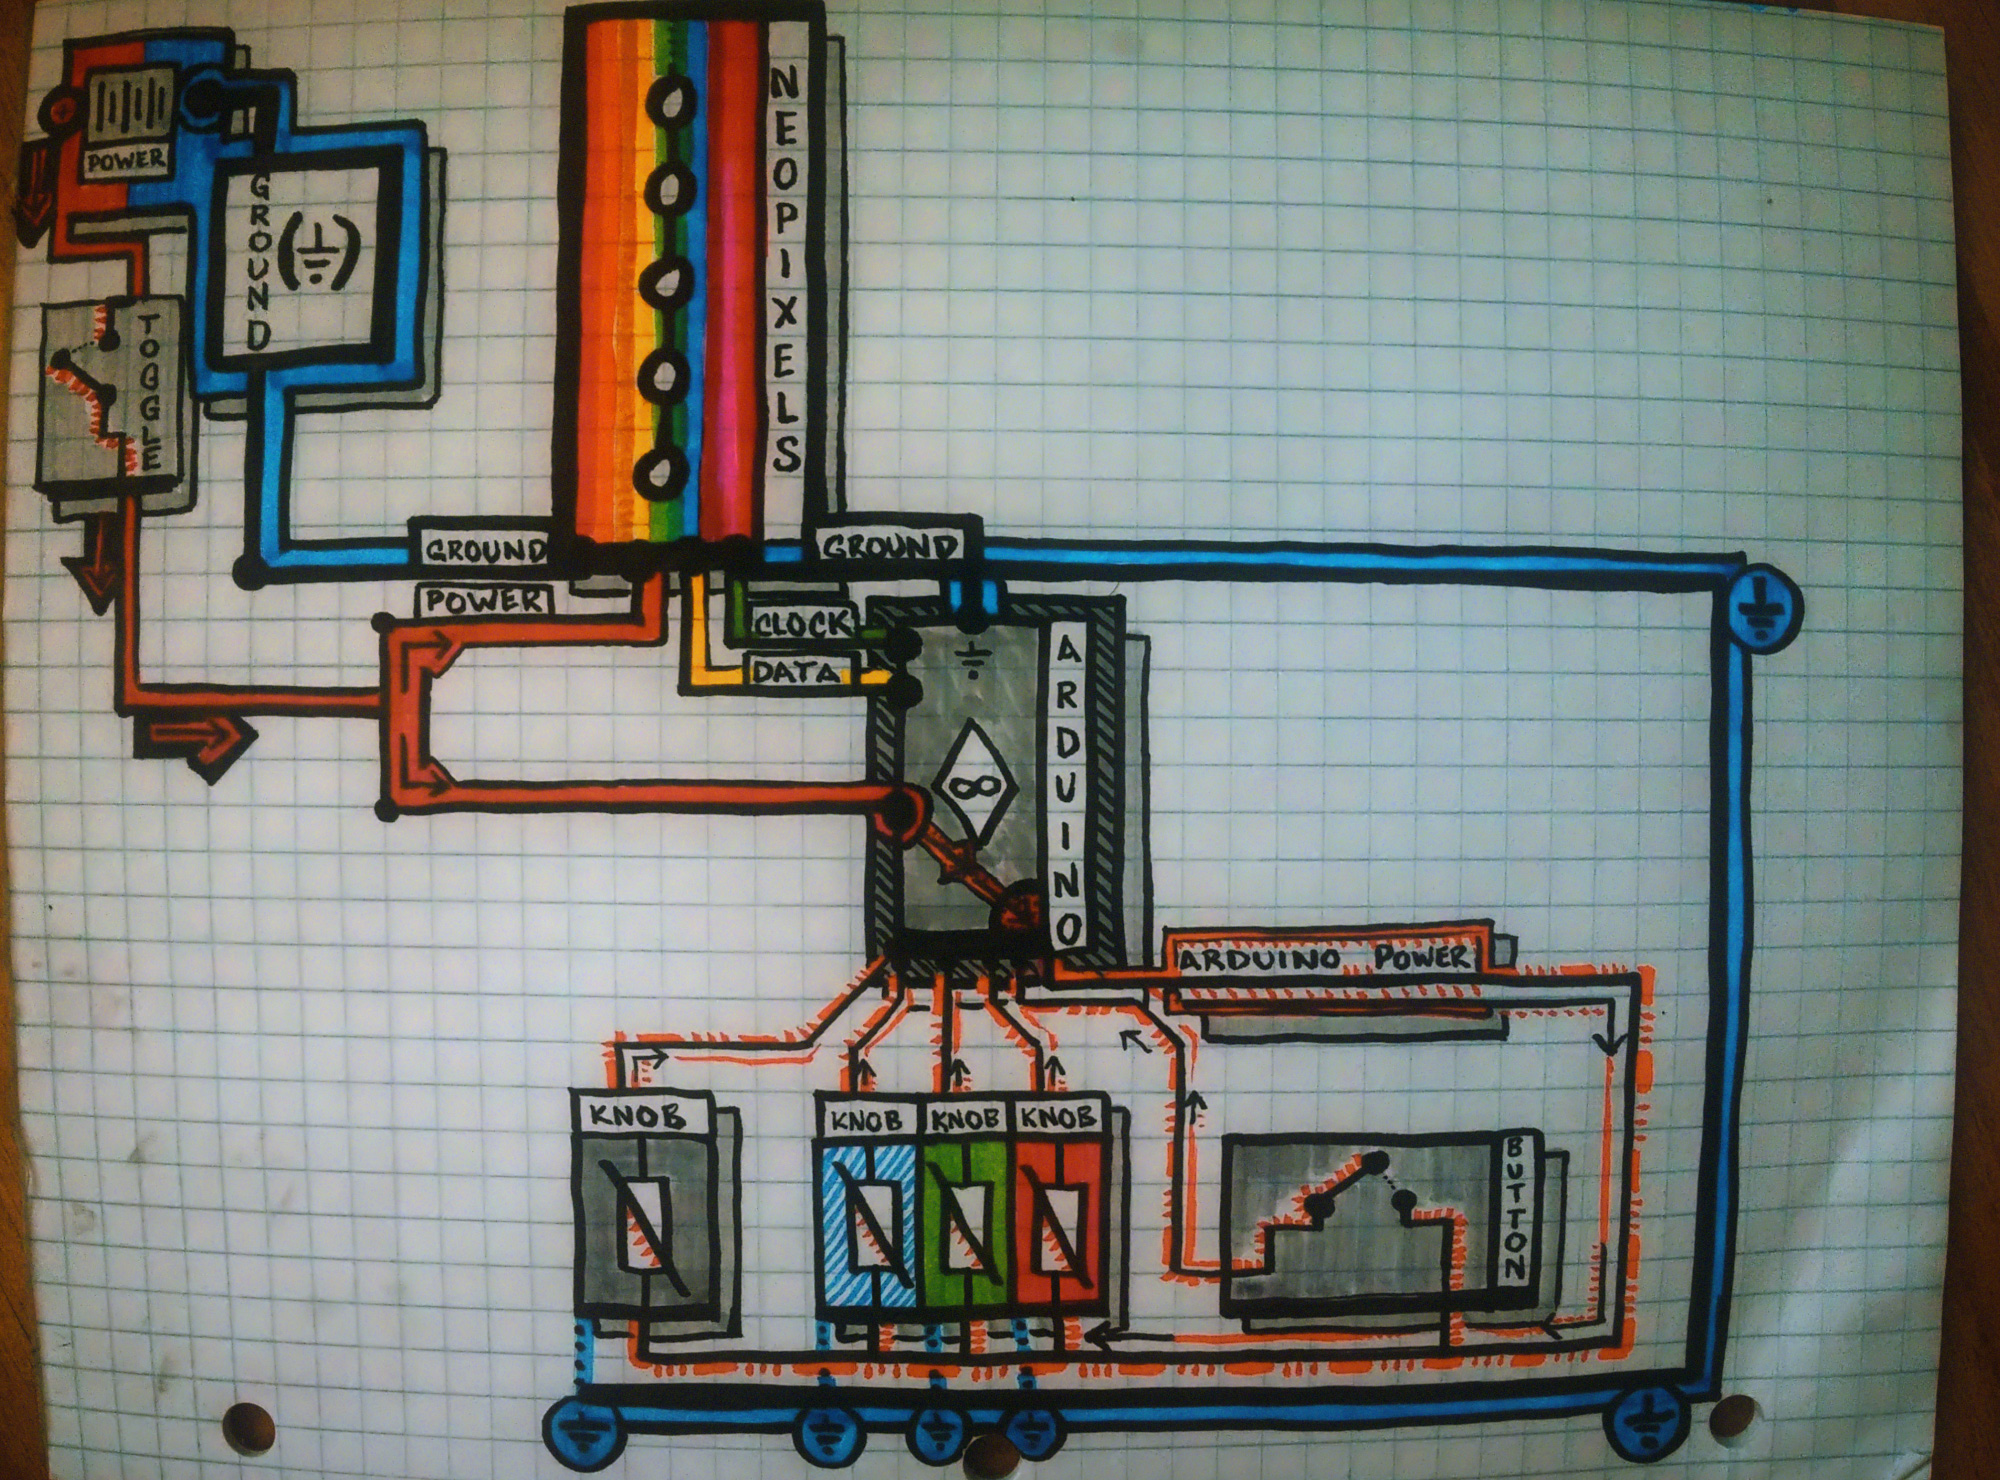
Let’s talk about the schematic. I drew one for the CoFoiNo in bright colors, just to describe it here.
Our power supply is in the top left. The schematic symbol for a DC power supply is a few pairs of alternating tall-short vertical lines, so it has a tall line on one side indicating power (where Pinocchio riders get on), and a short line on the other indicating ground (where the riders get off).
There’s one big blue ground line being shared throughout the entire project, and this is true of most circuits — you want everything to share a common ground. There aren’t any return arrows on the schematic indicating that current in the ground wire goes all the way back to the far side of the power supply, but you could picture it that way. There’s also a big red line — power — which makes its first stop at a giant comedy-sized toggle switch.
The symbol for a switch is pretty sensible, it looks like a wire with a door swinging out of it; idea being, close the door, close the circuit — connect the wire. When the toggle switch is open, the actual physical connection inside the switch is broken, the wires are separated by air and the power doesn't go anywhere. (Another way of thinking of it is that the air has infinite resistance, which could be an an infinite number of vomiting frat guys holding up the line, or just a “this ride is closed” sign.) When the switch is connected, the power moves on through the circuit.
The Arduino and the Neopixels are both getting their power straight from the source, in the form of the solid red line. The Arduino takes its share of charge, uses some of it to do its Arduino-ing with, and then uses the rest to power any peripherals it's attached to. What's nice about this is that once you've powered an Arduino, the Arduino can turn around and provide you with a “safe” 5-volt source — which I represented on the schematic with a dotted orange line — that you can use to measure the throughput of knobs and buttons and stuff without worrying about blowing the Arduino out of the water with more voltage than it can handle.
Using the nice 5-volt power source from the Arduino, we set up a couple of "rails" — that is, an open canal of power, an open gutter of ground — and just tap into them for our control surfaces as necessary. This amounts to a parallel circuit, where every little device is drawing from the same big pipe as equals, instead of one device getting first dibs on the power and passing along the leftovers.
The CoFoiNo has five controls; there are four knobs ("that's potentiometer to you, buddy") and a big button. (" Momentary push-button switch , please, I didn't go to school for eight years to be called a 'button.'") As far as our circuit is concerned, the button and knobs are almost exactly the same thing: power goes in on one side, gets adjusted by the user, and delivered to the Arduino in a thusly-chosen state. The button does this with all-the-way-on or all-the-way-off signals, at 5 volts or nuthin’; the knobs return something between 0 and 5 volts depending on how twisted they are.
("Twisted," synonym of "insane." That just happened. The system works, people.)
So. Arduino provides power, power goes into button, button is pushed, power is looped back into Arduino. Right? The Arduino measures that signal digitally , which is to say it's only accepting two answers: "on" or "off.” Makes sense for a button. Meanwhile — Arduino provides power, power goes into knob , some amount of power gets shaved off and sent to ground, and whatever’s left over is looped back into the Arduino. How much is left over? To find out, the Arduino measures analog -ly, which is to say it’s accepting 1,024 answers: “on”, “off,” plus 1,022 shades of on-ness to off-ness in between. It compares the voltage coming in — 2.5 volts? 0.8 volts? 4.6 volts? — to the voltage that it provides — 5 volts — takes note of the fraction, and rounds to the nearest 1,024th.
Once the Arduino has this information — “hey, is the button being pressed?,” “hey, how much red, green, and blue is being asked for?,” “hey, where’s the tile-dropping knob at?” — it can fill in all the variables it needs to run the Connect Four program, which means it's ready to go. (And it only needs to know the RGB knob values once per player per game, in the "pick a color" bit, so despite those variables constantly being checked they’ll spend most of their time not-mattering.) The code then proceeds to do its clever work of taking user variables, rearranging them into commands for updating a grid-based list, translating those commands into Neopixel-ese, and sending them off.
The Arduino talks to the user by reading voltages that the user sets; the Arduino talks to the Neopixels by writing voltages for the Neopixels to read. Remember, the Neopixels are kind of like dumb little Arduinos; they can read a digital signal the same way an Arduino can. Simple to say, but the way this actually happens brings to mind a quote from noted sci-fi author Arthur C. Clarke, who said, “any sufficiently-advanced technology is indistinguishable from magic.”
Let’s just say that digital communication is sufficiently-advanced. The short version goes like this:
Four wires on the Neopixels — power, ground, data, clock. Power and ground do what you’d guess; data and clock are both for blinking out digital signals, same as the CoFoiNo’s button sending digital signals to the Arduino. The Neopixels check the clock wire constantly; when a new data command is about to be sent, the Arduino blinks the clock to get the Neopixels’ attention, and then keeps blinking it at a steady pace so both devices can be sure they’re picking up what the other is putting down. (Basically, what a conductor does for an orchestra, the clock wire does for the gizmos.) Once synchronized, the Arduino painstakingly blinks a morse-code-ish command onto the data line, building numbers one bit at a time, and this command will eventually — if you wait around long enough — provide R, G, and B values for every single Neopixel on the strand.
It takes about a thousandth of a second.
What’s nice is that you don’t have to actually program these impossibly-fast conversations between Arduino and Neopixel, because they’ve already been programmed into a code library that you can simply drop wholesale into whatever Neopixel-y thing you’re doing; sometimes that’ll be making a TV-colored glow appear on the wall behind your TV, sometimes it’ll be m aking a cheap box that you’ve forked with extreme prejudice learn to play a game you don’t even like.
· · · · ·
Enough theory, let’s build it.
Building an actual permanent circuit is wonderful . You put on some tunes, study your schematic, grab a circuit board and start throwing components together. You can translate the perfect circuit drawn on your schematic into any kind of criss-crossed mess you want — the schematic o nly demonstrates how the bits connect to each other , after all, the layout is flexible — and you can do it with confidence because the prototype worked and the schematic is just a map of the prototype.
Throughout the previous weeks, when not fiddling with notebooks or Neopixels or code or the box, I‘d been fiddling with circuitry. I’d made a few permanent circuits — some worked, some didn’t; some were fixable, some weren’t; some I fixed, some I literally ruined; some I ruined by mistake, some I ruined just to scare the others. I’d also gone ahead and burned myself a few times with the soldering iron, just to make sure I could. I hit the same handful of mistakes everyone hits when first forming soldering safety habits. (As a side note for any n ervous pre-solderers: none of those burns were unavoidable — as in, it’s not like I was paying perfect attention and soldering is just dangerous, or whatever — they all happened after soldering, when I was being dumb and holding onto the iron after I needed to be. I’d do some absent-minded “there’s a thing in my hand I’m not paying attention to” maneuver that resulted in me touching the metal. Dumb. Not smart.)
There was a moment of concern prior to building the final CoFoiNo circuit, because I didn’t really know where to begin with it — then I cracked up. ‘ Begin?’ This was the end . N ot only that, but what was there to be concerned about? I had become an old pro at not knowing where to begin.
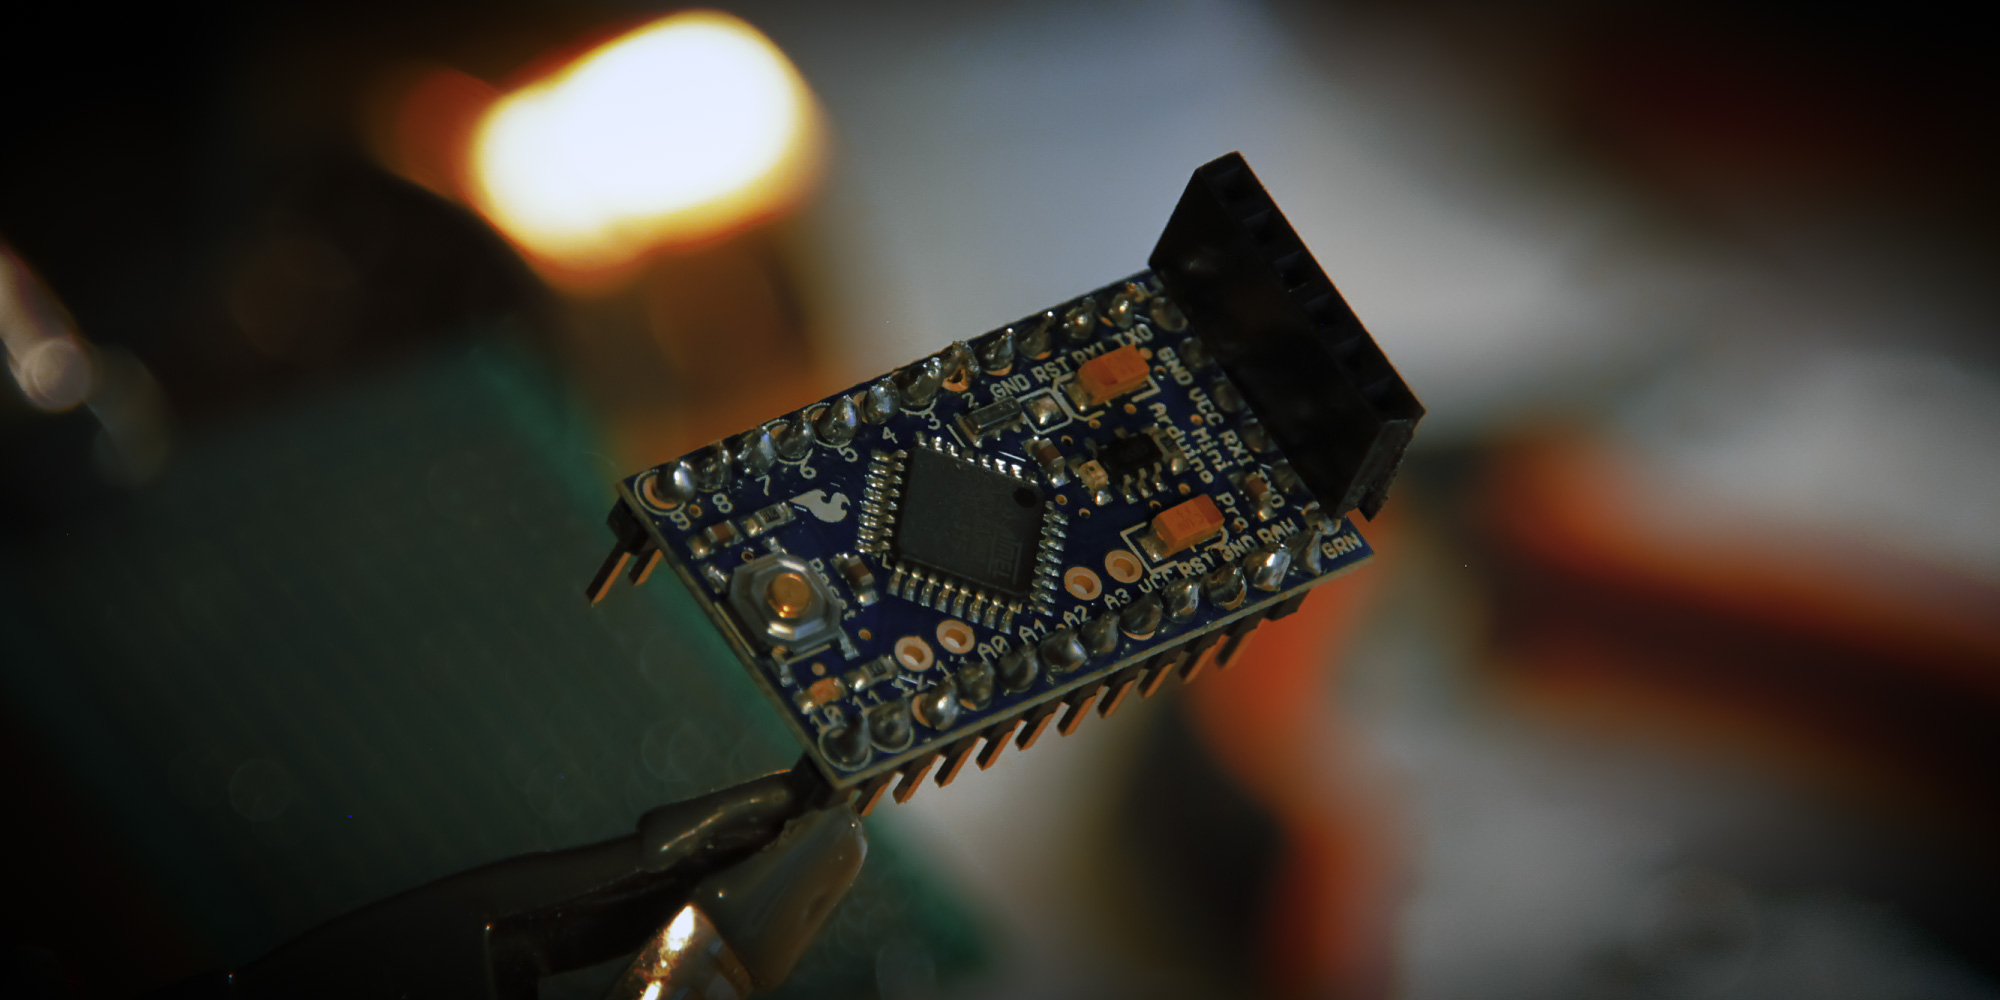
There's a dozen or so "official" Arduino boards to choose from, and hundreds of third-party boar ds that are just as good or better — this means you can pick the Arduino board that suits your needs on a per-project basis, without really having to learn anything new as you move from board to board. An Arduino Pro, for instance, is pretty much just a flat Arduino Uno; instead of having the Arduino Uno's big boxy I/O pins for sliding wires into, the Arduino Pro has tiny solderable rings perforated around the edge of the board. Sleek and permanent. The board I wanted to use with the CoFoiNo was an Arduino Pro Mini ; a third-party board that costs ten bucks and packs as much punch as an Uno, all while being roughly the size of your Enter key.
I heated my soldering iron, grabbed a drink, unwrapped the Pro Mini, and cranked some Boston.
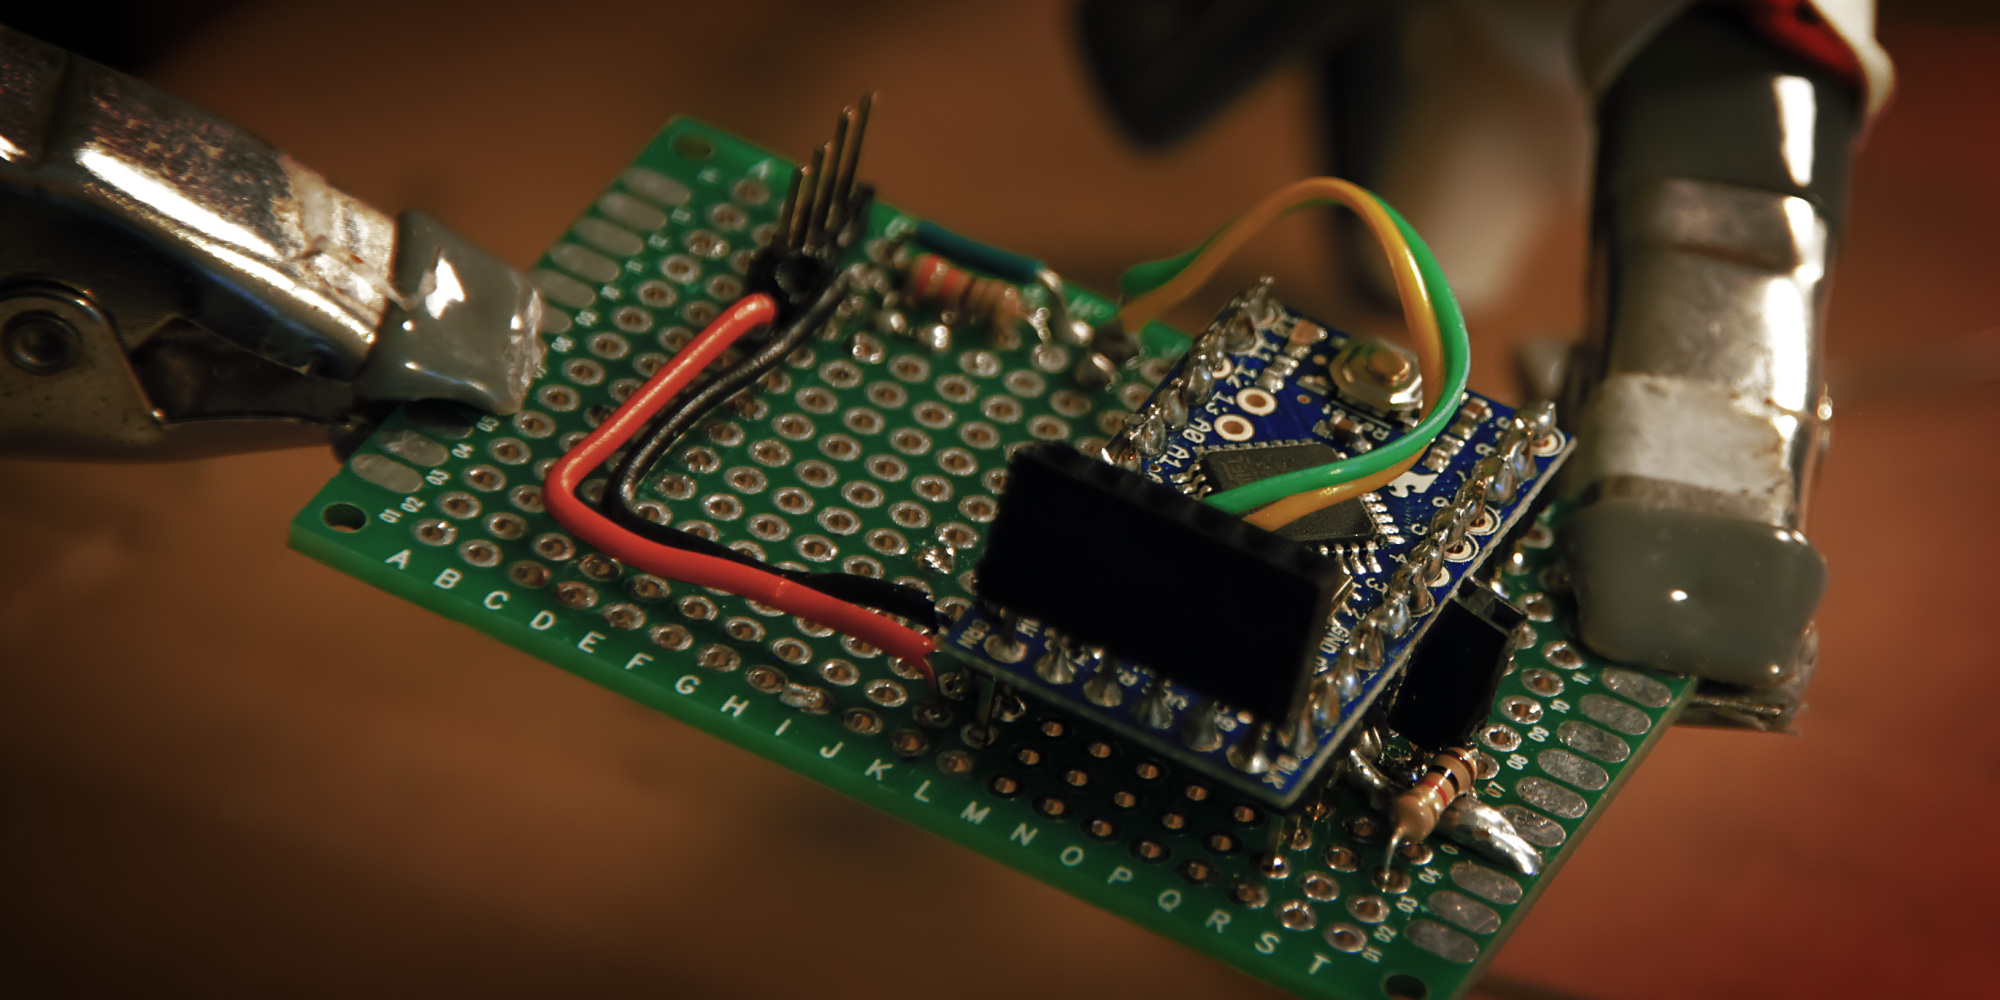
A "header" is a little plastic fence with metal pickets, delivering a quick plurality of evenly-spaced wires; they come in rows of thirty or so and you snip out as many as you want. I procured two rows of twelve male headers and soldered them under the Pro Mini like little centipede legs, then a female header was trimmed down to a row of six and soldered atop the Pro Mini's talkin' head.
(One of the compromises a Pro Mini makes for size is doing away with the traditional USB jack, replacing it with six solderable rings on one end; you provide a USB-to-wires breakout yourself and get the wires touching the rings however you please. I prefer to solder a female header directly onto the terminals, so I can connect and disconnect my USB cable all willy-nilly.)
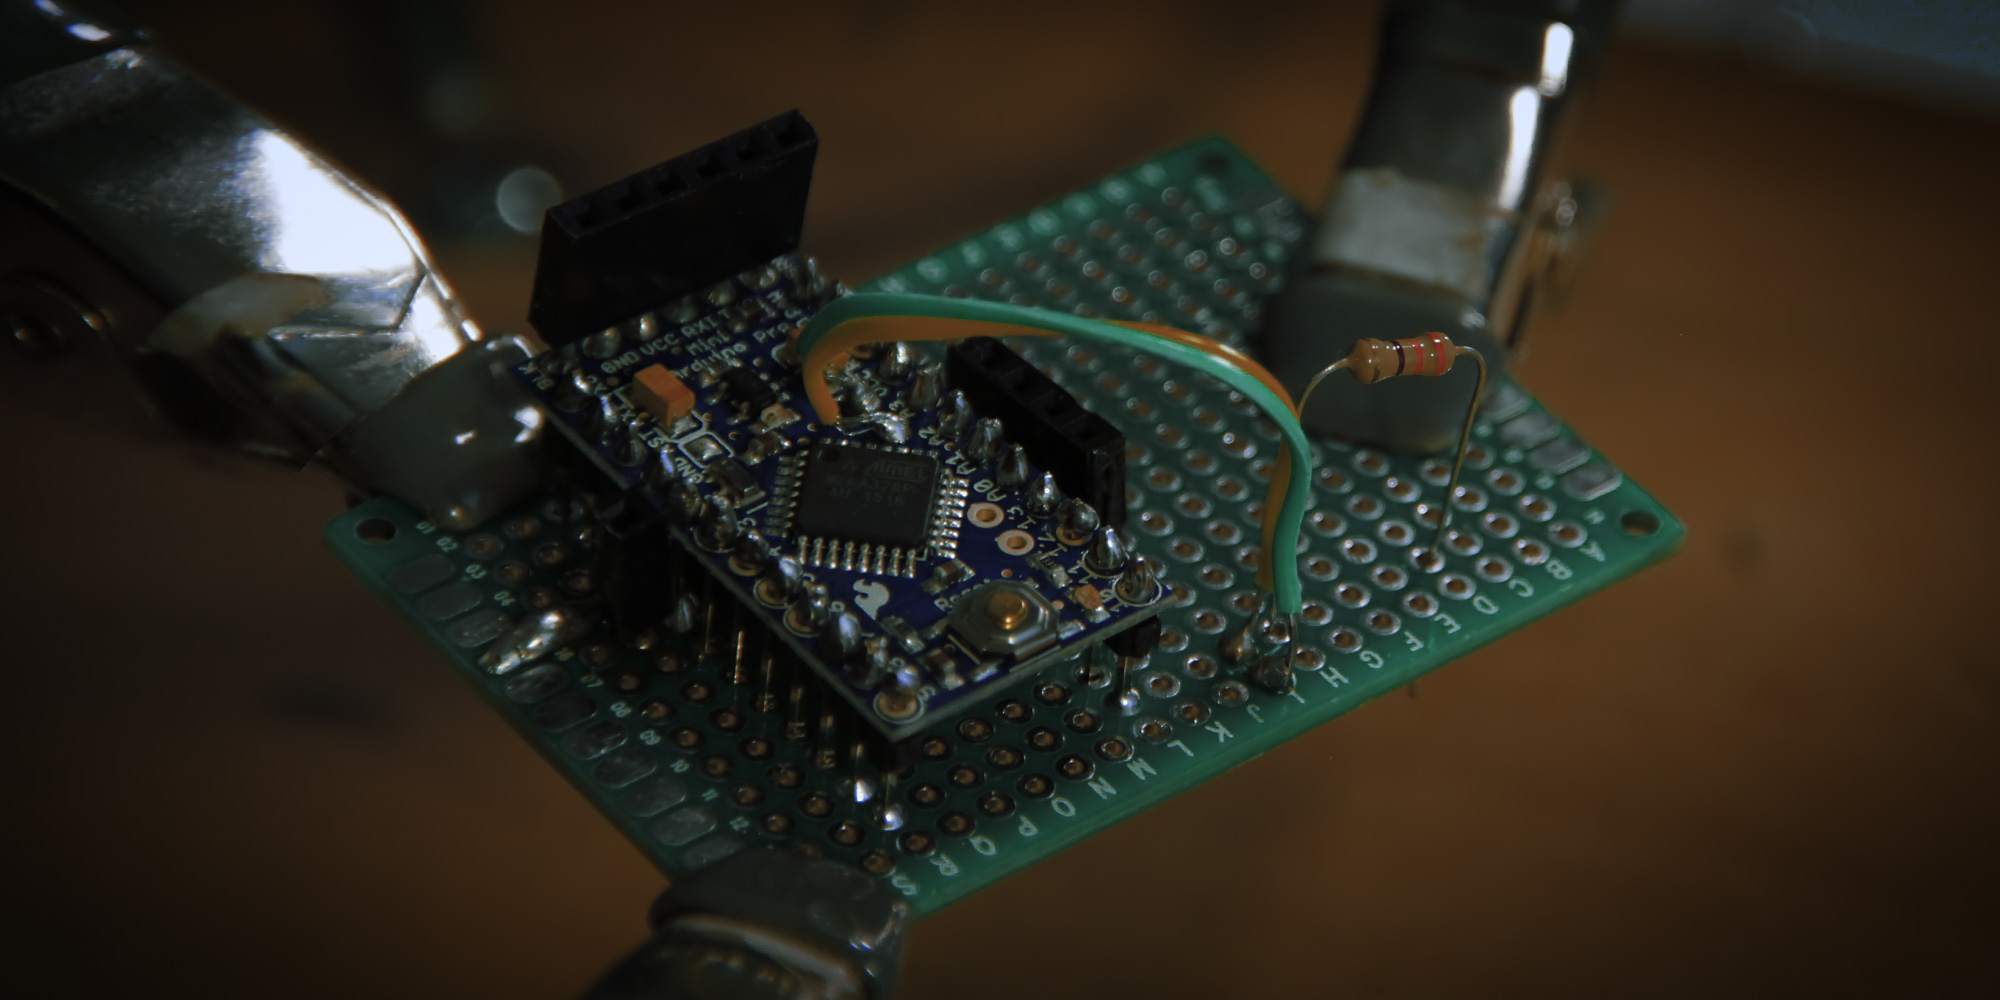
I scanned a nightmarishly-green sheet of perf, counting holes. I could put the Arduino anywhere.
Most of the circuit was straightforward — as in, "wire goes from the button to the Arduino with nuthin' in between" straightforward — but there were a few details that needed to be sorted out, so I started with them in case they’d make any demands on my perfboard real-estate. The main question was how best to connect the Neopixel cable to the circuit board; wherever a floppy thing meets a rigid thing, you can count on a point of failure coming to join. I decided the solution would be headers — male headers on the board, female headers on the NeoPixel cable. Not only would it probably look clean, but you may recall that header use allows for a great deal of willy-nillyness, which is next to godliness.
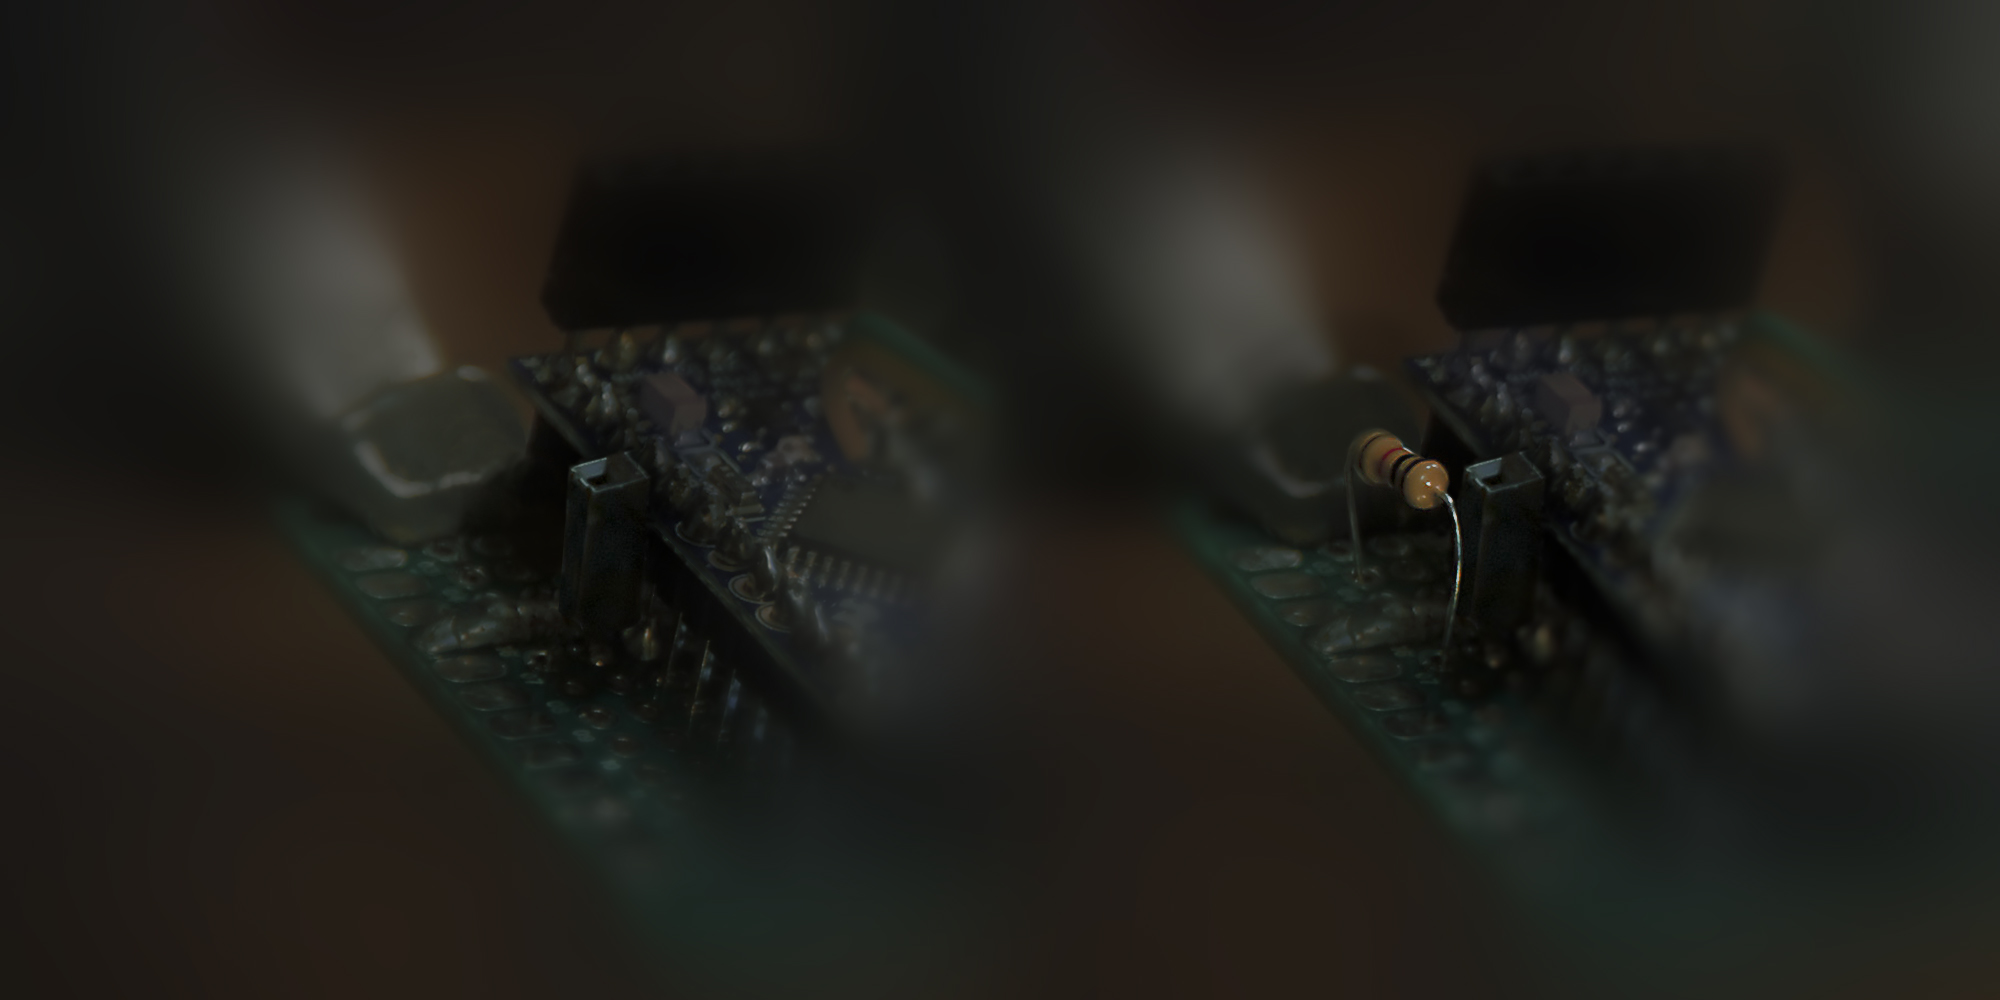
I hooked up clock's green wire and data's yellow wire to the Arduino and ran them both over to a staging area by the Neopixel header zone. This gave me a little room to install another little detail, a 330 ohm resistor — that’ll be stripes of orange-orange-brown, if you happen to be playin' the home game — on the data signal line between the Arduino and the Neopixels. Adding that resistor is one of the things they tell you to do with Neopixels when you buy 'em — please put a resistor across the data line, also put a big capacitor between power and ground. Will do, magic string.
While I was fiddling around with headers, I also went ahead and installed a single female header next to the Arduino terminal where my button would go. Installing a single header is pretty weird; this is one of those things where you could ask me why I went that way with it and I'd say the answer was "it felt right," when it would really be "it's fun to snap things in half with cutters and no header can escape me , " but whatever. Button wire goes into header, header goes into Arduino terminal. Done. Right?
A l most. There's one more connection the button wire needs to make, and the reason why is neat.
You'll recall that charge passes through the button into a wire on the far side that the Arduino measures, and that the Arduino will declare it all-the-way charged or all-the-way grounded when it does — such is the nature of a digital measurement ; "on" and "off" are the only two words in binary. When you let charge through the button, the Arduino has a pretty easy time deciding that the wire is charged; however, when you aren't pressing the button, the Arduino is still measuring the wire... and what does it see? Noise, probably. Little variations of voltage weirdness that are either getting picked up inductively or because you're a bad person.
There's a solution to this problem, and there’s also a problem with the solution. The solution is to connect your button’s output to ground , too — that way the fluttery "off" charges will get sucked out before they make it to the Arduino. The problem with that solution is that the "on" charge gets sucked out too, because the “on” charge is also lookin’ for ground, because every charge is always lookin’ for ground. Give charge an equal choice between ground and anything ; it'll choose ground.
Of course, the key word there is "equal." We can fiddle with “equal.”
One thing to keep in mind is that the charge kind of sees the Arduino as ground, too; just ground with some stuff in the way. As such, there are really two paths to ground the charge could take, a main path and an Arduino path. They’re not equal — the main path has less resistance — but we can fiddle with that. You want the “on” signal to take the Arduino path, but it won't, because that one ain’t the path of least resistance. Any ideas for how to solve this problem?
If you guessed, “add a resistor to the main path so the Arduino’s becomes the path of least resistance?,” then congratulations — you’ve just become the President. That was sudden, huh?
That-there solution is called a "pull-down" resistor, and you start to see it everywhere once you understand why it works. We want to keep the strong "on" signal when it gets pushed through, but lose the weak noise signals that are always there — so, we make a hurdle the strong signals can clear and the weak signals can't. When the button isn't being pressed, the fluttery noise on that wire is sucked ("pulled-down") to ground through the resistor, because that path — resistor included — is still less-resistant than the one through the Arduino. The line goes quiet and Arduino declares it "off." When the button is pressed, the charge on the wire is suddenly strong enough that the Arduino declares it "on," despite a little bit of charge being lost to the other path.
After my distracted swerve through Button Corridor, I snipped off a quartet of male headers and installed them in Neopixel Country. I took the green and yellow wires I’d set up earlier and soldered them into place at the first and second headers, and cut some new wires in black and red for ground and power. I soldered each to their respective headers, then spent a minute making a pretty little ninety-degree bends in the wires where they'd reach over and connect to the Arduino.
"Is that actually important?", you ask. "Putting pretty little bends in the wires?"
"There has literally never, " I begin, "been anything more important," I continue, "than putting pretty little bends ," I add without blinking, "into every single wire . "
You wonder why you asked. I wonder too.
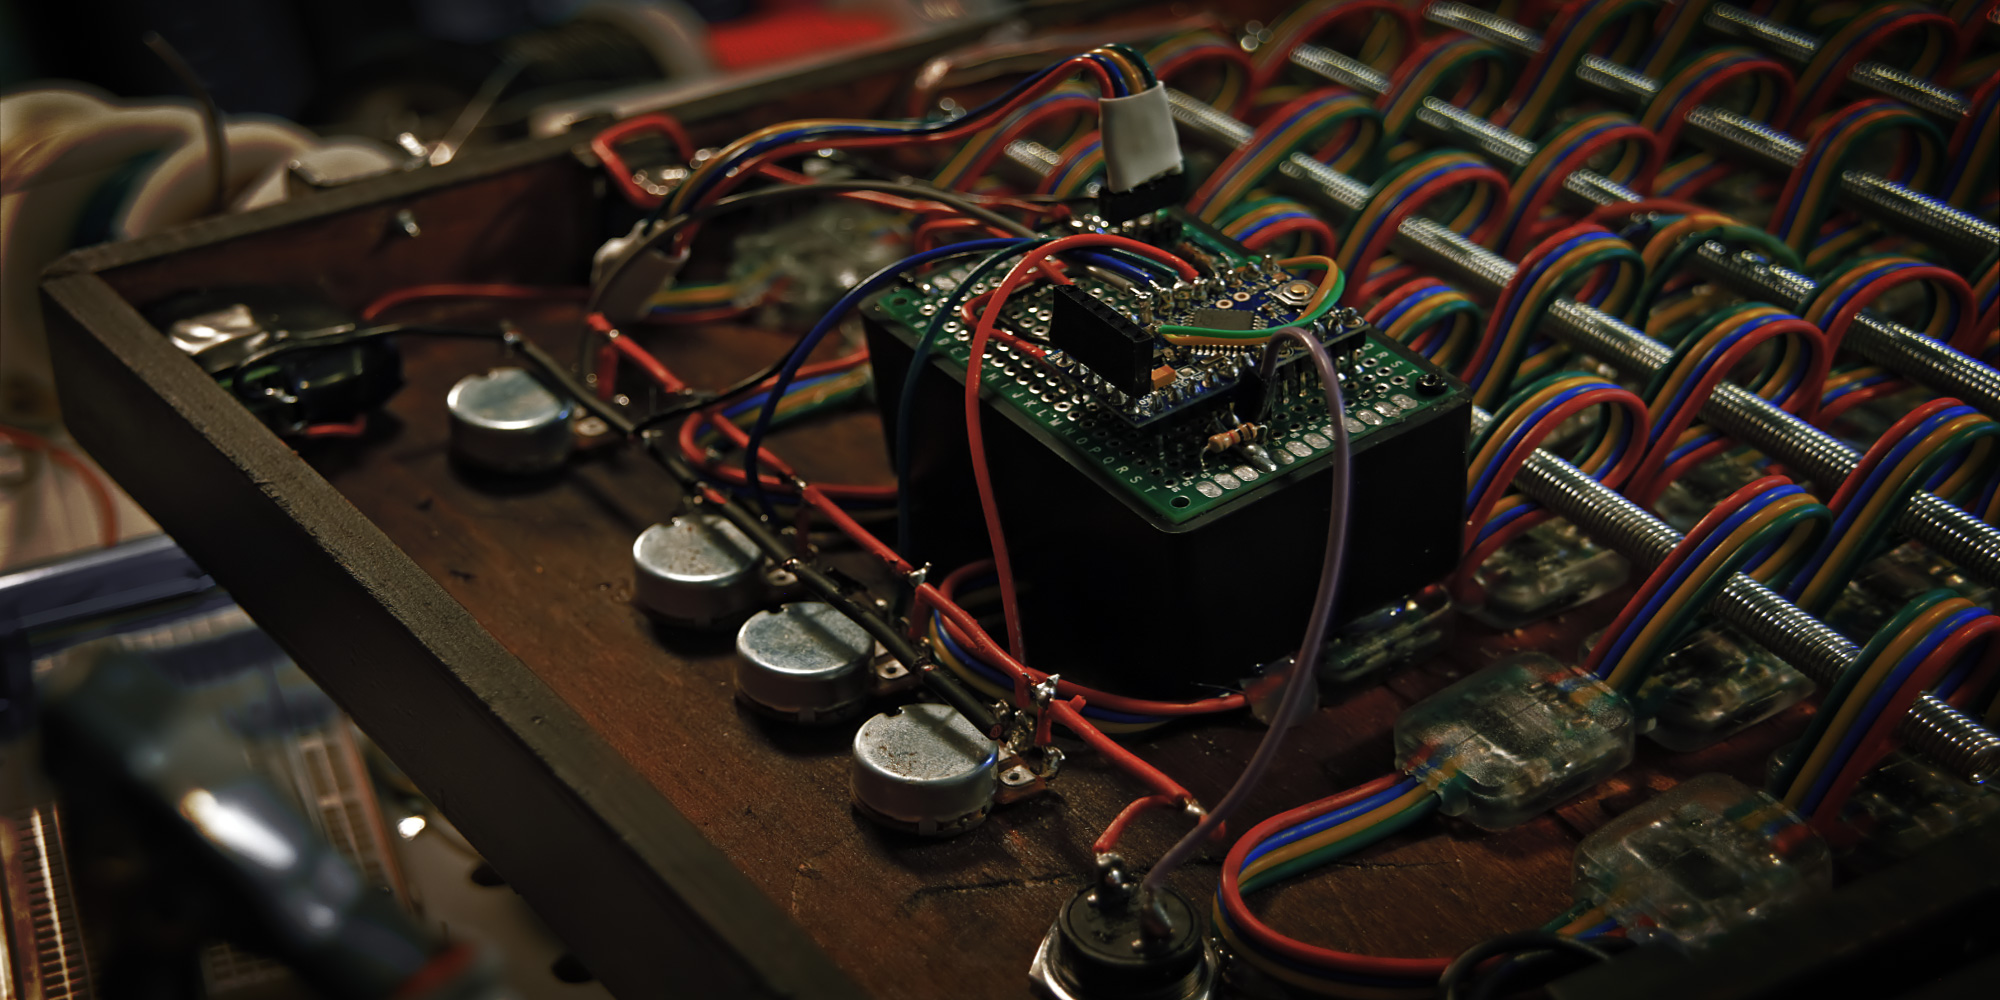
I soldered my inarguably-valuable bent wires to the Arduino's ground and power terminals, and the insular little world of perfboard inhabitants was complete. It was time to hook up the box.
I wired all of the power components that were installed in the side, starting with the barrel jack where the power brick plugs in. I put a big 'ol capacitor across power and ground, just as the Neopixels asked for, and secured it to the jack with two miles of electrical tape. The cap-coupled power supply was then provided with a wire to carry juice into my giant comedy-sized toggle switch, which in turn was provided with a wire to carry juice into a little voltage regulator chip that blends it up and serves it cold at a refreshing 5 volts. I left the wires temporarily dangling from the power regulator and moved on to my control surfaces.
I made a rail of red wire and hooked it to the power side of all five components, then I made a rail of black to share ground between the potentiometers. (The button didn't need a ground connection, because whatever goes into the button comes out at the Arduino.) Ground was equal across the project, so hooking the ground rail up to the ground terminal on the barrel jack was no problem. The power rail would ultimately be connected to the Arduino's “safe” 5-volt output, but I wouldn’t have an Arduino to connect it to until the circuit board was mounted in the box.
There's a few ways to mount a circuit board onto your project; for one thing, they come with nice big holes at the corners that you can push a screw through, so there’s that. For the CoFoiNo, I just screwed the board on top of a plastic box with perfectly-matching dimensions — a random lucky find — and then affixed the box with a little help from my friend "all the hot glue in the world."
(That’s the thing about hot glue: it's only cheap-looking if you can see it. Put it under something.)
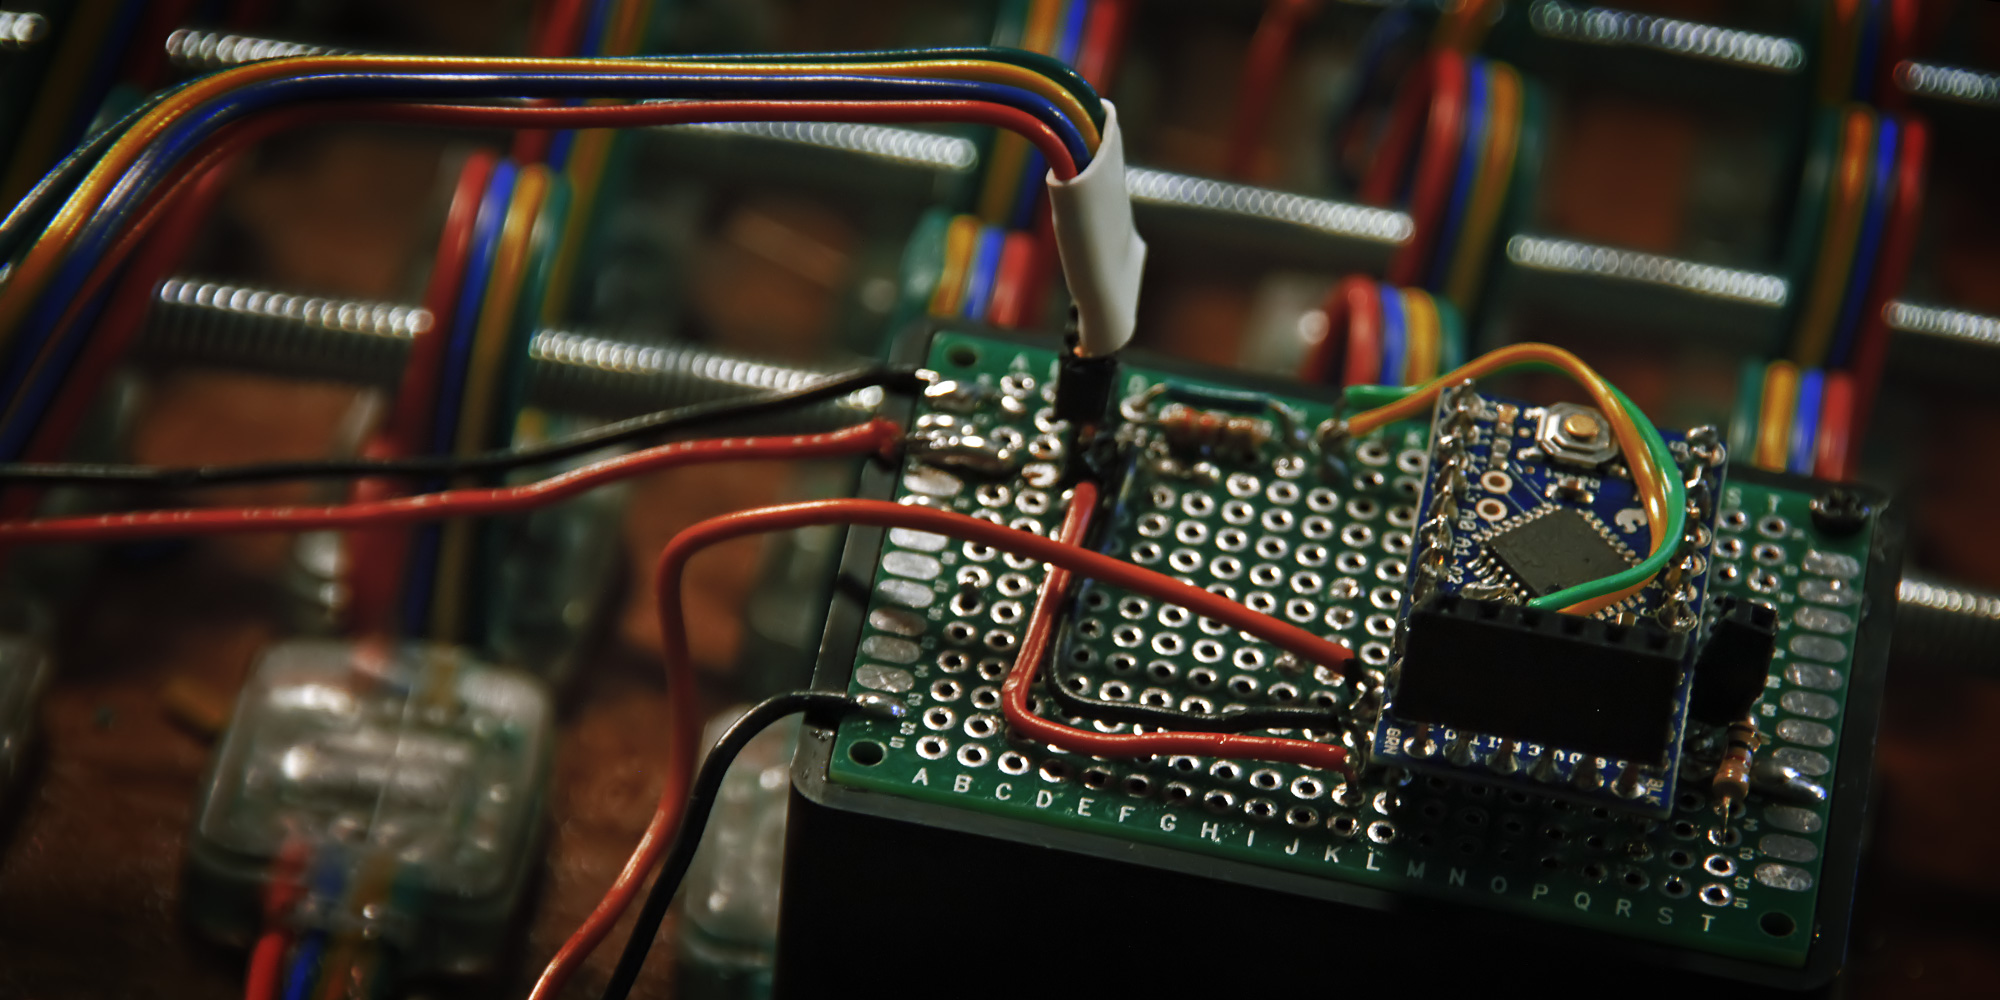
With the circuit board mounted, I was able to connect all the power thingies to the grid. I used the previously-danglin' wires from my voltage regulator to bring power and ground straight over to the Neopixel headers, whereupon the connections also split off and carry power and ground to the Arduino in a pair of wires with pretty ninety-degree bends.
I made myself a Neopixel-lookin' extension cord and popped a female header onto the end of it; the other end I soldered directly to the real Neopixel cable. I plugged my newly-pluggable cable onto the circuit board headers; it slid on easily and felt solid once it got there. The willy-nillyness was all but inevitable.
The last bit of the circuit was the simplest — I soldered output wires to the five controls. They already had power hookups; all that was left to do was connect their output to the Arduino.
What happens when you take a whim, add two months, plug it into the wall, and flip the switch?
Nothing, because you messed-up something and you'll have to troubleshoot for a while until you figure it out — and then it still won’t work, because you messed-up something else and you’ll have to troubleshoot that, and so on. You won't know when it's going to be fixed, you won't even know if you're actually fixing it; all you'll know is that you're trapped in a nightmare of indeterminate breadth and that your moment of truth is on the far side of it. Don't get frustrated; troubleshooting is how the universe tests grit. This is the last fight, and the only way through is to protect your ambition from your mood, focus on the problem in front of you, and proceed from each devastatingly-stupid puzzle you solve by saying " thank you, universe, may I have another ?"
I troubleshooted another thing, flipped the switch to check, and suddenly the CoFoiNo was done.
Arduino wasn't the only new addition to my life in those early months of sudden focus; there was also lettering, club-juggling, bass guitar, bicycling, classical music, and a whole slew of unrelated books about how the world works, ranging from rare earth metals to string theory to grammar to the FCC. The buzzing in my head where the internet used to be — yeah, that took a few things to tamp down, not just the one.
But I did silence the buzzing in my head, and I did get electrons to dance for my amusement, and I did learn the way to shore by jumping off of the boat. The stupid plan worked. For this I thank the modern American philosopher Christopher Walken, who has said, "if you want to know how to build a house, build a house; don't ask anybody, just build a house" — and who presumably said it in a Christopher Walken voice.
It's been a year now since I sat down with a dollar-store notebook and started copying schematic symbols, and since then I've finished not only the CoFoiNo, but also a miniature one called "CoFoiNo Micro," plus a handful of synthesizers and musical instruments, and Rick and Morty props, and toys, and experiments, and just followed up on more whims than I can recount here. Ideas that randomly occurred to me as a thing that might work if you knew how to build 'em, whereupon it also occurred to me that I did know how to build them. The visions of power that descended upon me when Paul first explained what Arduino was; whims like these are how that power manifests itself.
Whim example: I made a guitar tuner that works by blinking an LED at the same rate as the tuned string should vibrate, so you can tune each string by watching it vibrate under the blinking light and tightening the string until it stands still, mid-vibration, perfectly in sync with the blinking. Occurred to me, thought it would, built a prototype, totally worked. Second whim example: I made a spectacularly dorky wearable device called the Fantasia Engine (this name brought to you by the underappreciated visionary responsible for "radiopunk") that creates a lightshow in front of your eyes in time with whatever music you're listening to, either automatically by doing a live spectrum analysis of the audio, or manually by measuring "conducting" gestures you make with your hand and converting them into a three-dimensional color picker.
Ultimate power, I’m telling you.
· · · · ·
In the early months of 2015, I decided to stop doing pretty much everything I’d been doing up until that point — certainly to stop thinking how I’d been thinking up until that point — and unplug everything.
Then I tried something new and plugged it in.
Teague Chrystie
April 24th, 2016